How to Start Coinmetro Trading in 2025: A Step-By-Step Guide for Beginners

How to Register on Coinmetro
How to Register a Coinmetro Account [PC]
1. Firstly, you’ll need to head over to the Coinmetro homepage and click [Sign Up].

2. When the registration page has loaded, enter your [Email], click [Set password], and then input the code. Once you’ve finished reading the Terms of Service, click [I agree to the Terms of Service and Privacy Policy] before clicking [Create Account].
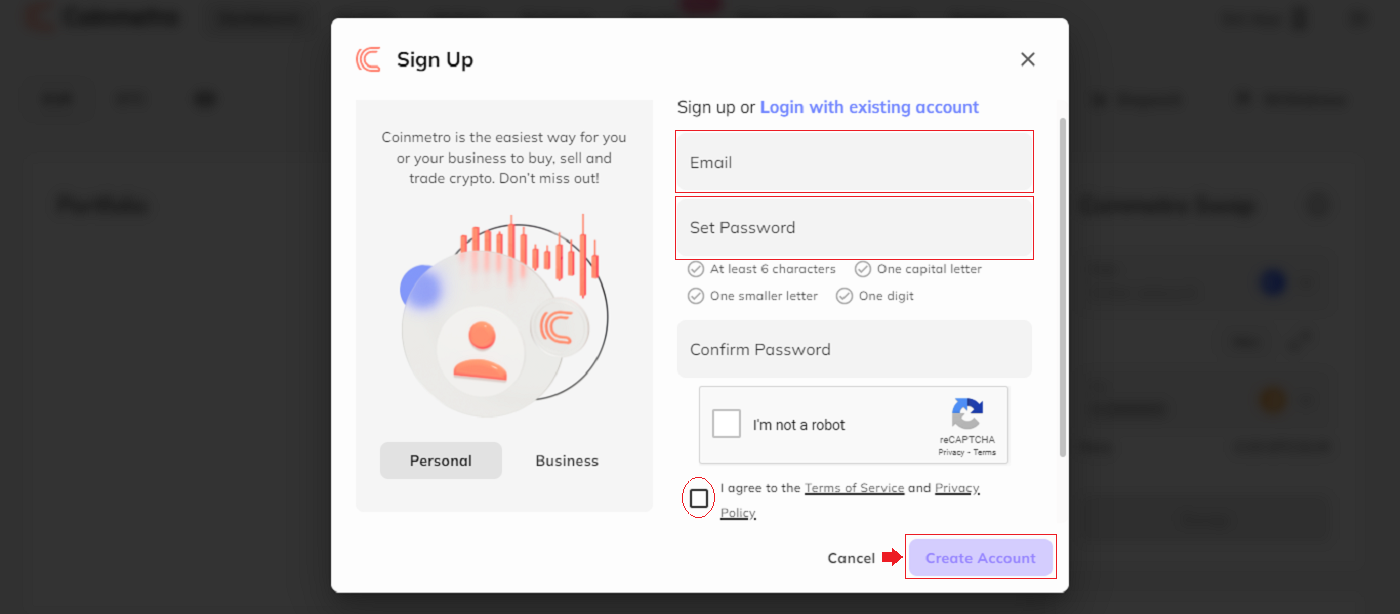
Remember: Your registered email account is closely linked to your Coinmetro account, so take precautions to ensure its security and choose a robust and complicated password that includes uppercase and lowercase letters, numbers, and symbols. Finally, make a meticulous record of the passwords for the registered email account and Coinmetro.
3. After completing steps one through two, your account registration is complete.
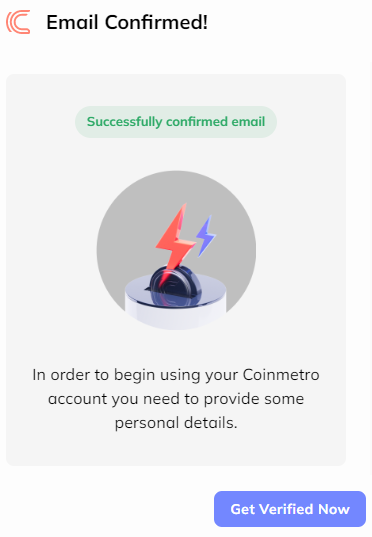
4. You can use the Coinmetro platform and start Trading.

How to Register Coinmetro Account with Gmail
Alternatively, you can sign up using Single Sign-On with your Google account and log in with the click of a button.1. Visit the Coinmetro homepage and click [Sign up] in the top right corner.
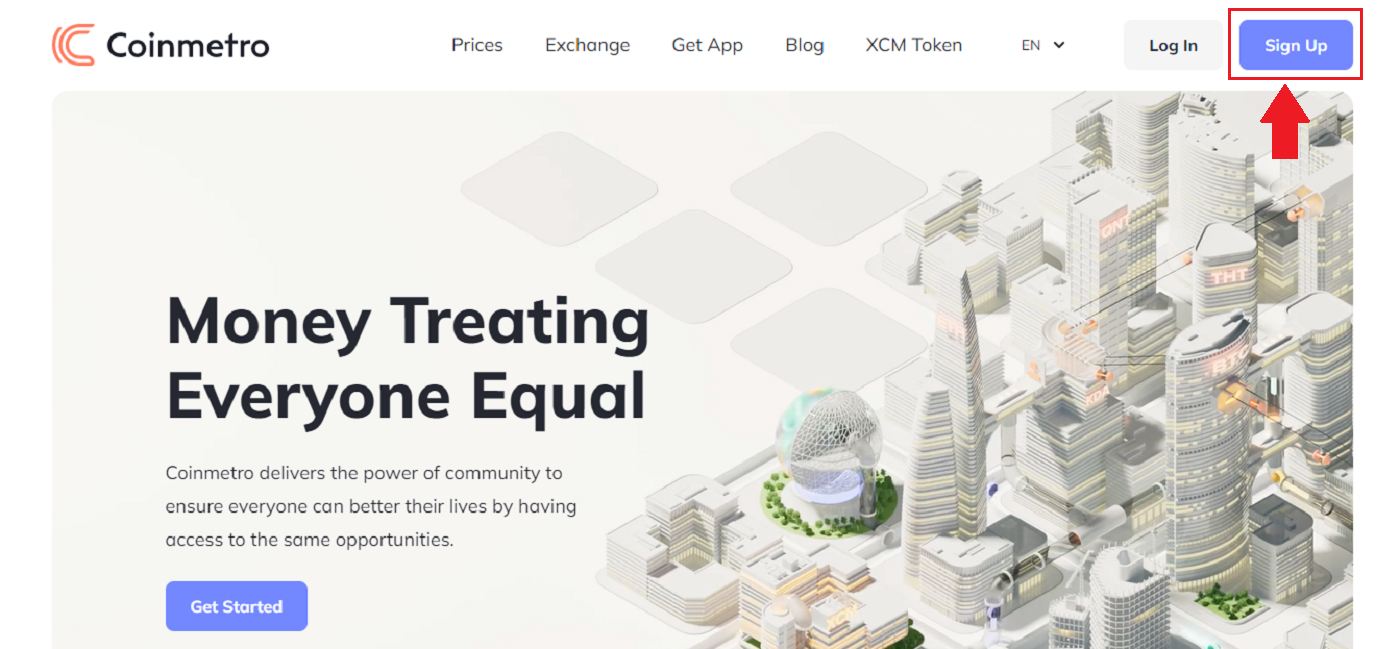
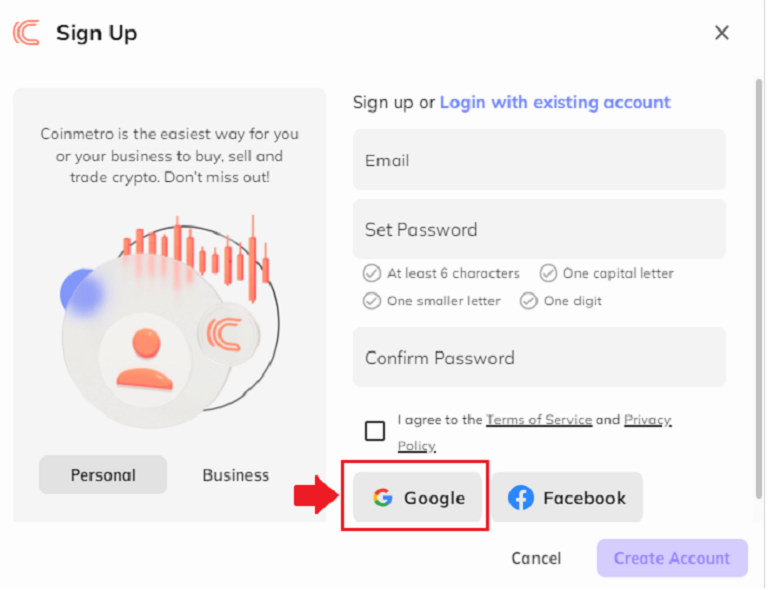
2. Click on the Google button.
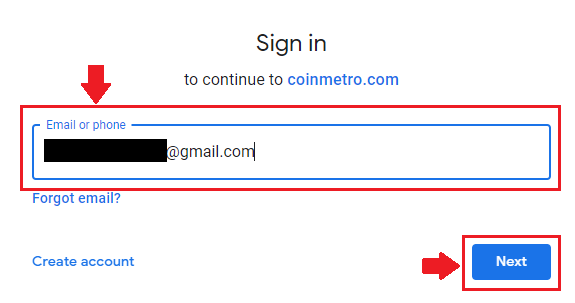
3. Google account sign-in window will be opened, where you will need to enter your Email address or Phone and click on “Next”.
After that, you will be taken directly to the Coinmetro platform if you follow the service’s instructions to your Gmail account.
How to Register Coinmetro Account with Facebook
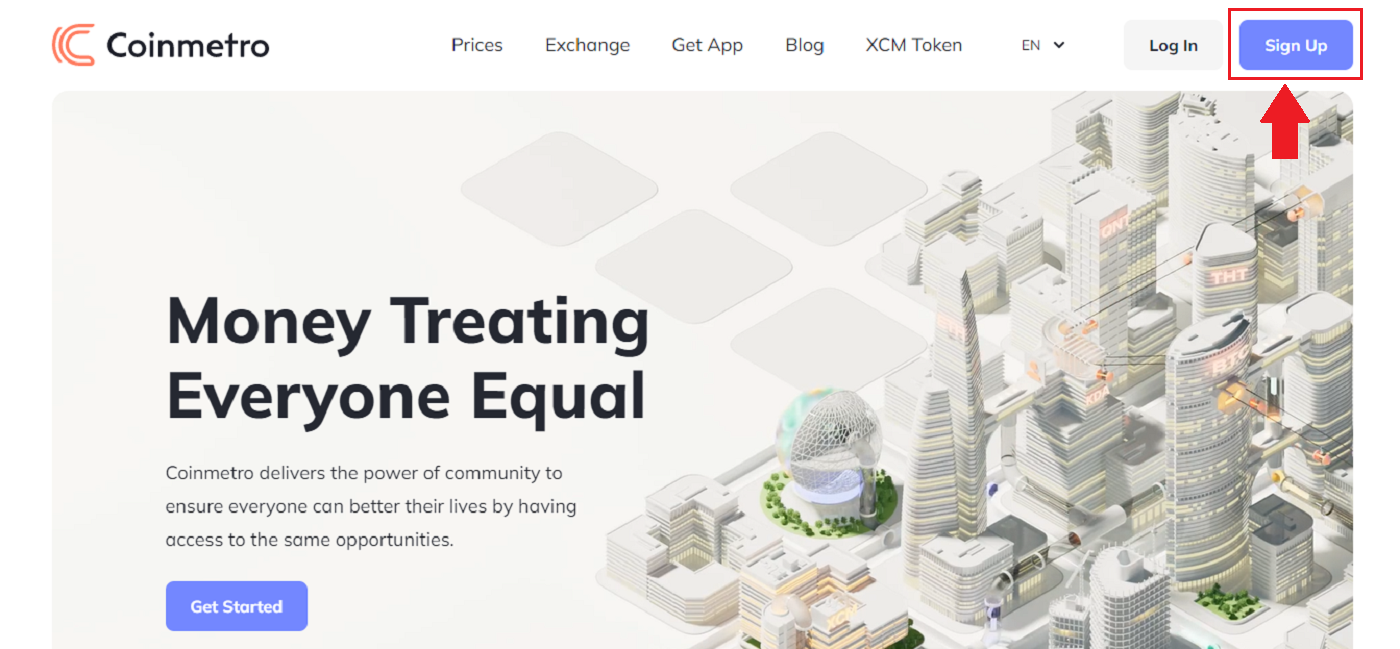
Also, you have the choice to sign up for an account using your personal Facebook account, which can be done in just a few easy steps:1. Go to the Coinmetro main page, and select [Sign up] from the top right corner.
2. Click on the Facebook button.
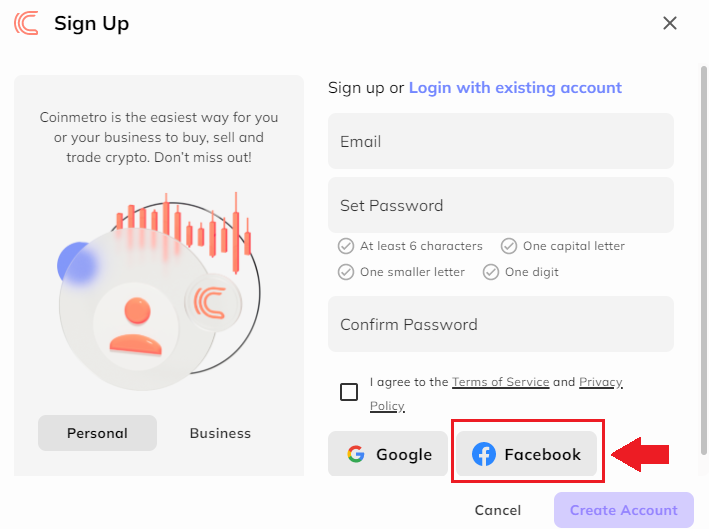
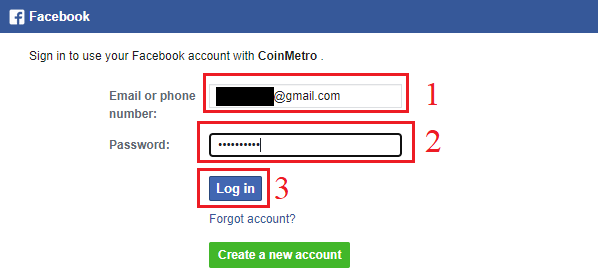
3. The Facebook login window will be opened, where you will need to enter the email address you used to register on Facebook.
4. Enter the password from your Facebook account.
5. Click on “Log In”.
Coinmetro is asking for access to Your name, profile image, and email address after you click the "Log in" button. Click Continue under the...
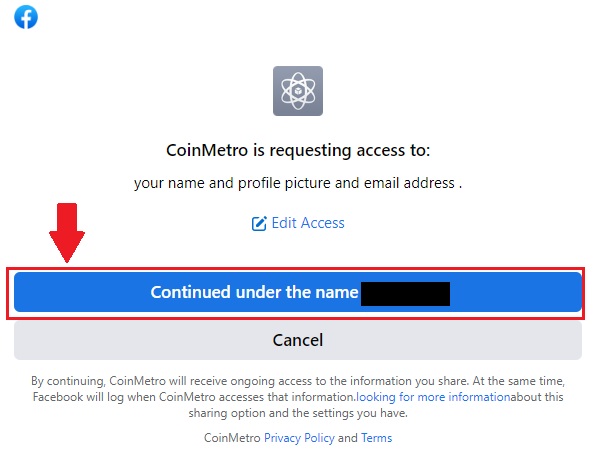
You will then be taken instantly to the Coinmetro platform.
How to Register a Coinmetro Account [Mobile]
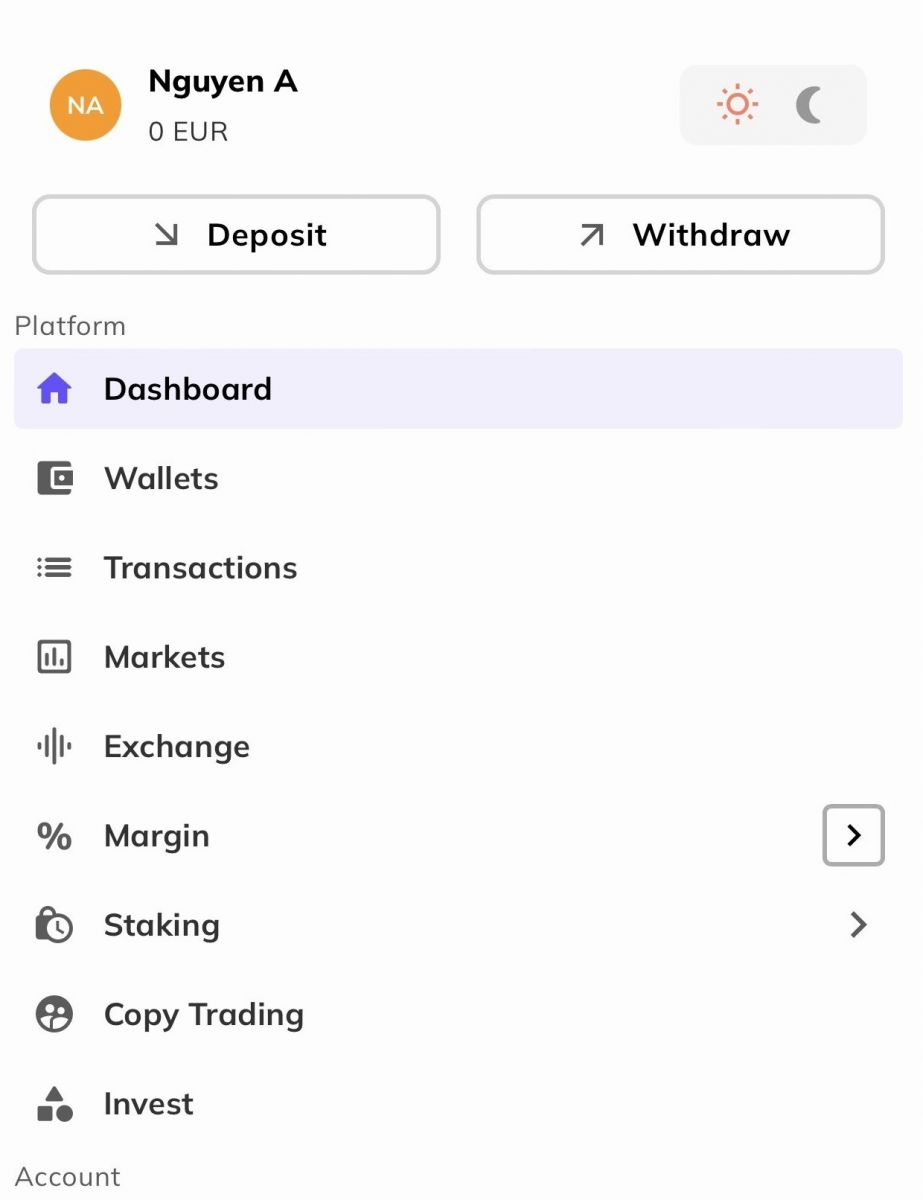
Register via Coinmetro App
1. Open the Coinmetro App [Coinmetro App iOS] or [Coinmetro App Android] you downloaded, Click on the [Don’t have an account? Sign up] at the bottom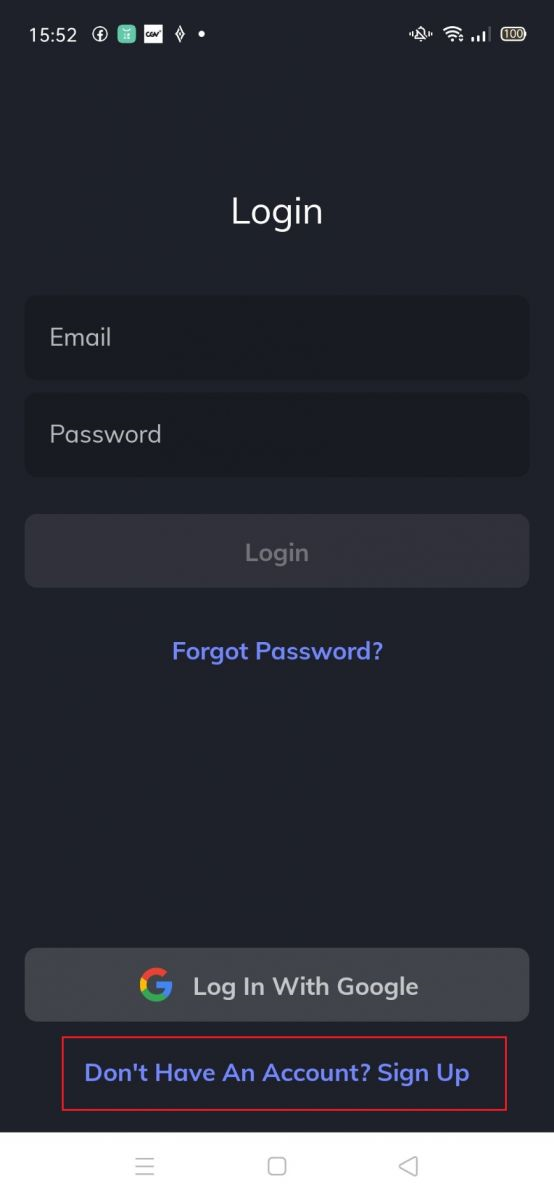
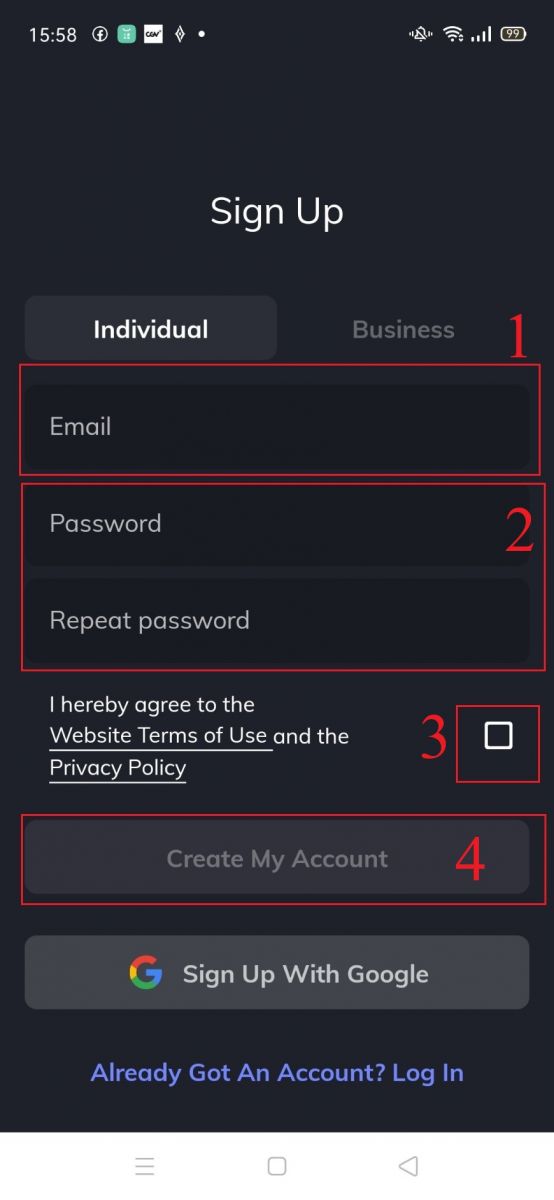
2. Put in [your Email] and [Password], enter [Repeat Password], Read the terms of service and click [Create My Account] to confirm your email address after doing so.
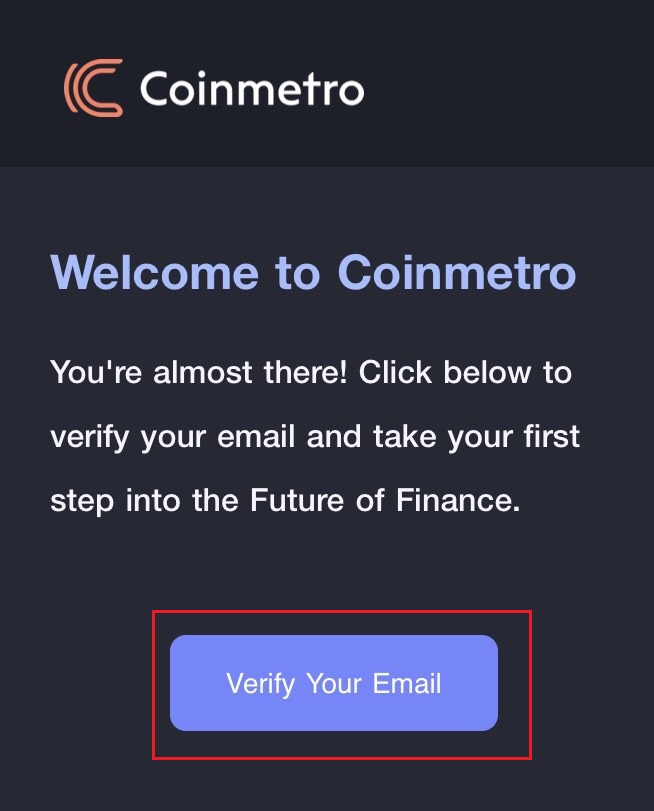
3. Click below [Verify Your Email] to check your email.
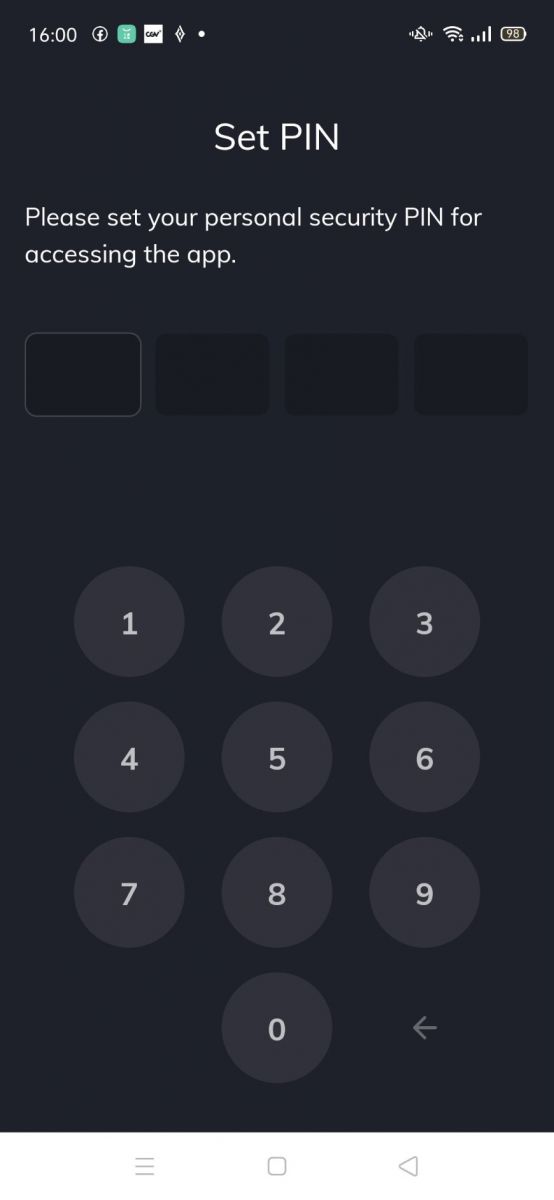
4. Set up your PIN code, and click on [Confirm]. Now you can log in to start trading!
5. Click [Verify] if you want to verify your identity.
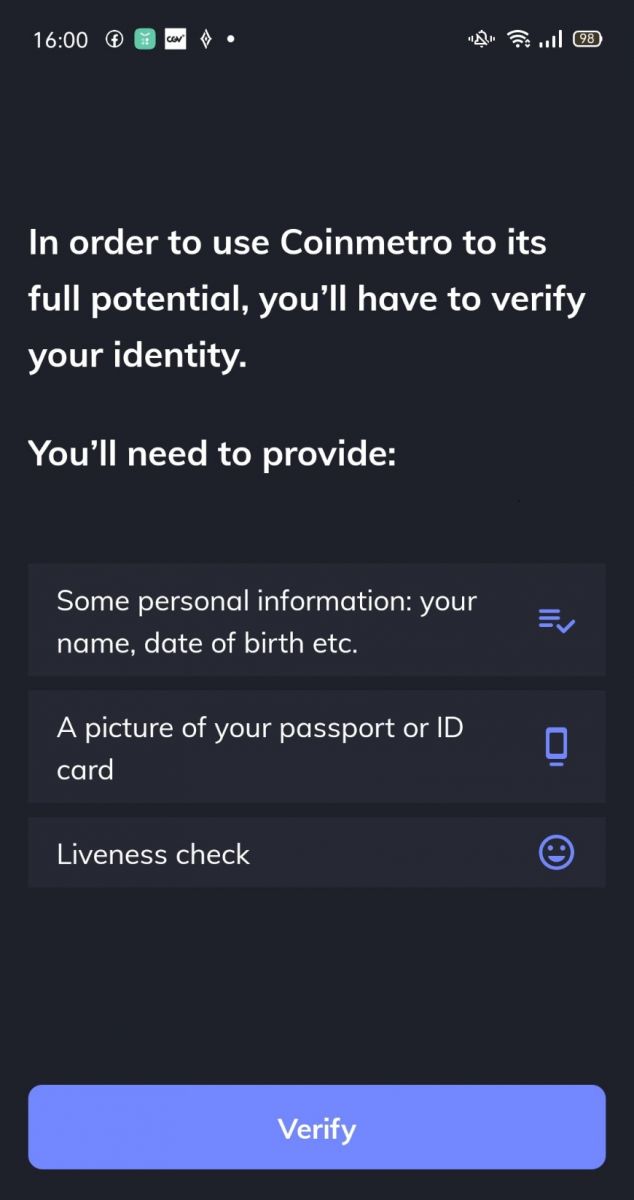
6. Your account registration is complete.
Register via Mobile Web
1. To register, select [Sign Up] from the menu on the Coinmetro MainPage.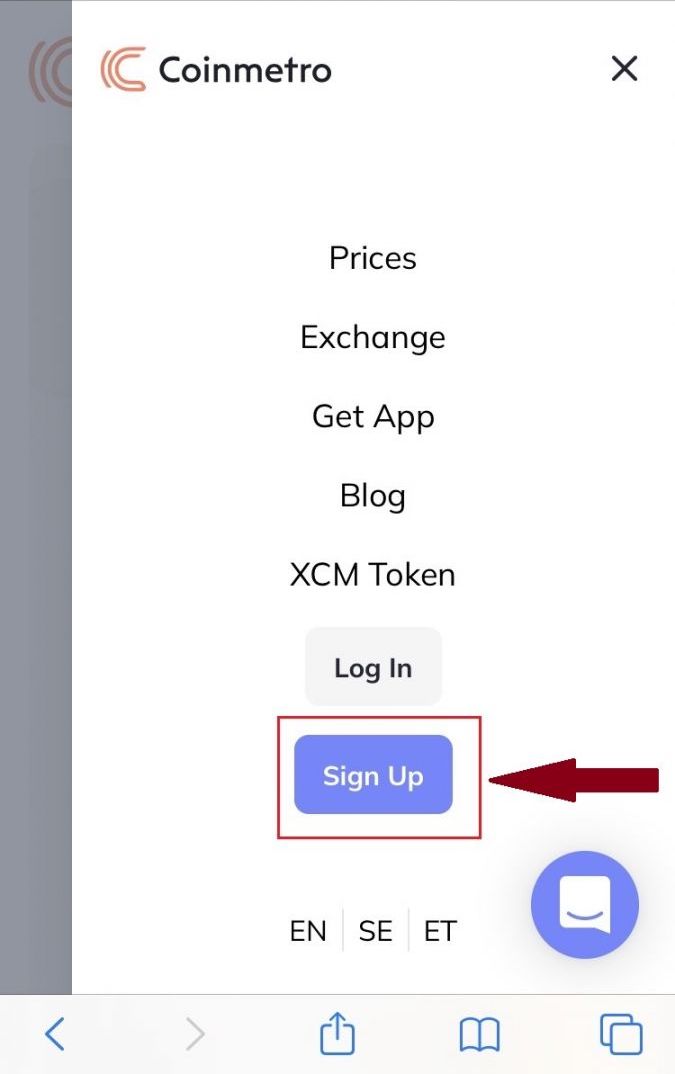
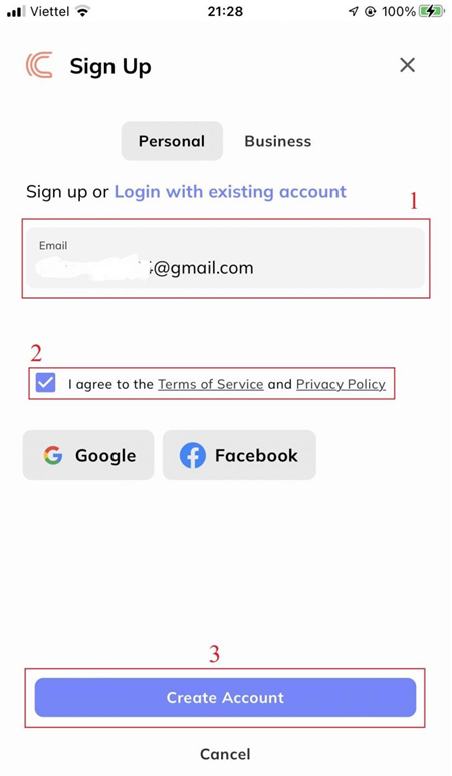
2. Put in [your Email], Read the terms of service, and click [Create Account].
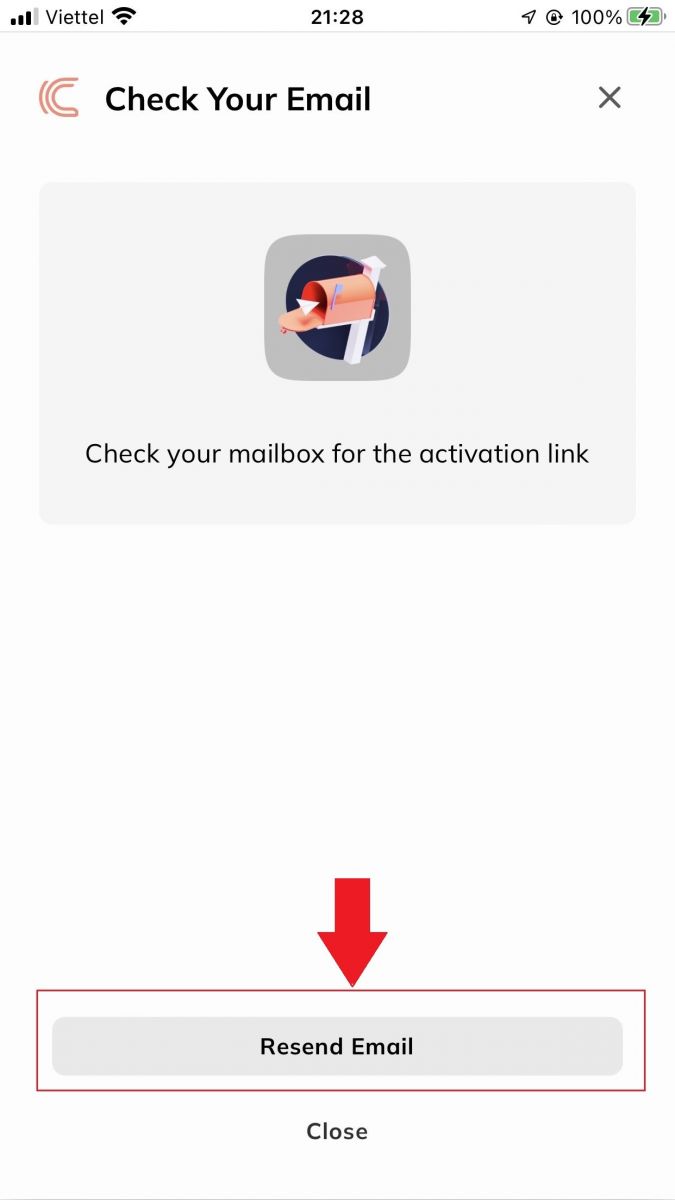
3. Check your email, if you have not received the account verification link, click [Resend Emai].
3. To validate your account, click [Verify Your Email].
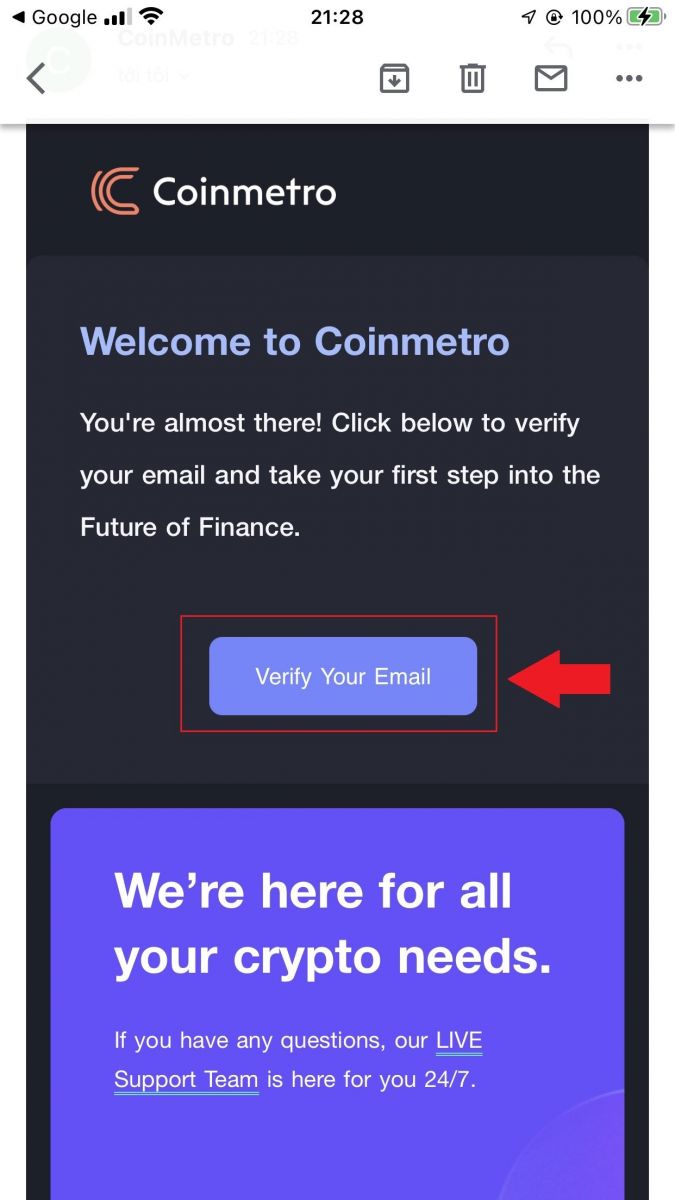
4. Your registration for an account is complete.
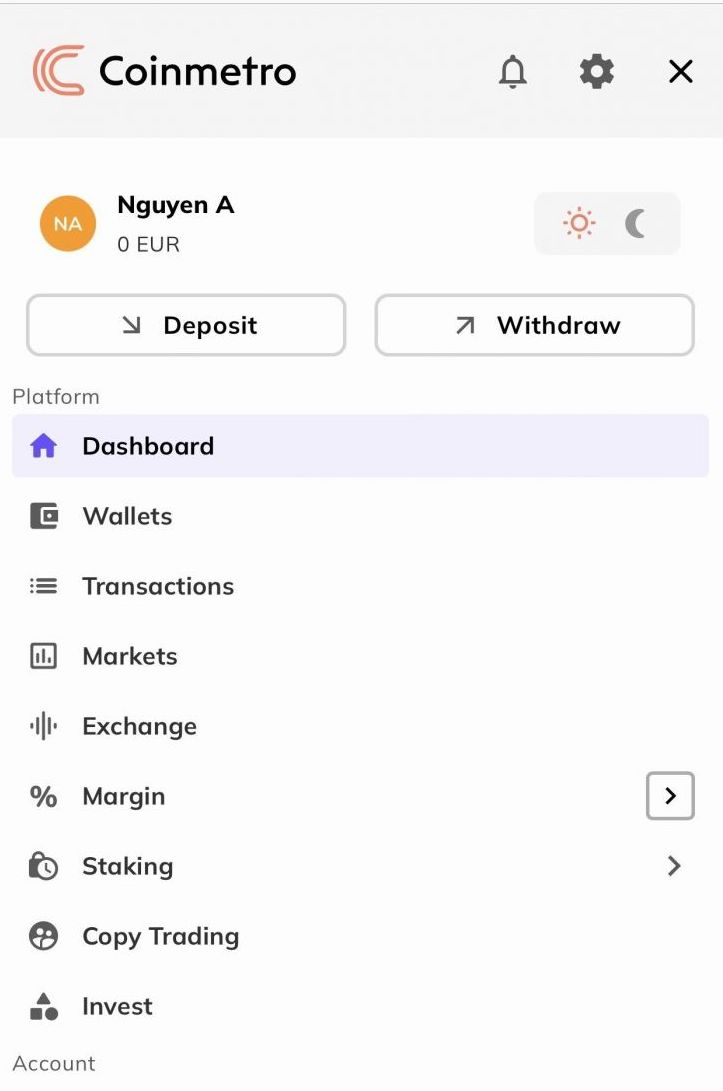
Download Coinmetro App
Download Coinmetro App iOS
1. Download our Coinmetro App from App Store or click Coinmetro Crypto Exchange.2. Click [Get].
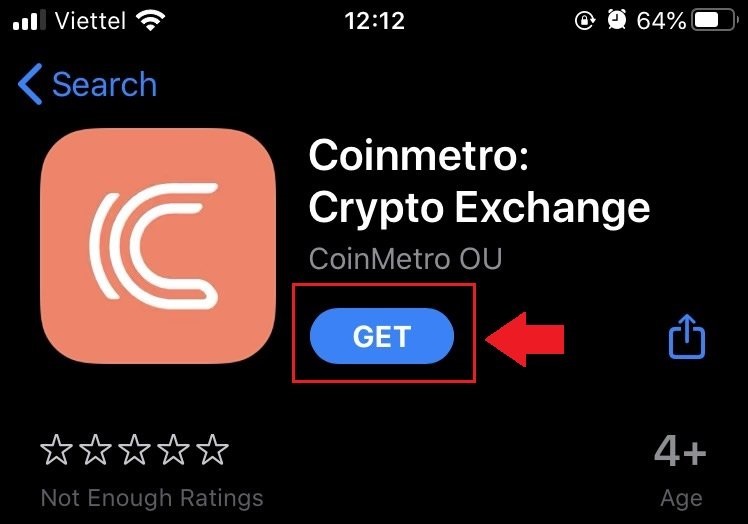
3. Wait for the installation to complete. Then you can open the app and sign up on Coinmetro App.
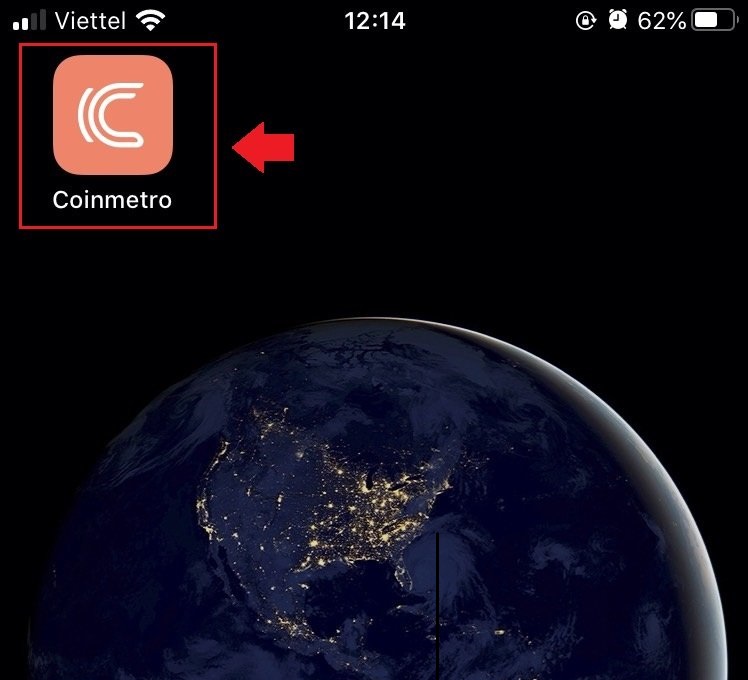
Download Coinmetro App Android
1. Open the App below on your phone by clicking Coinmetro.2. Click on [Install] to complete the download.
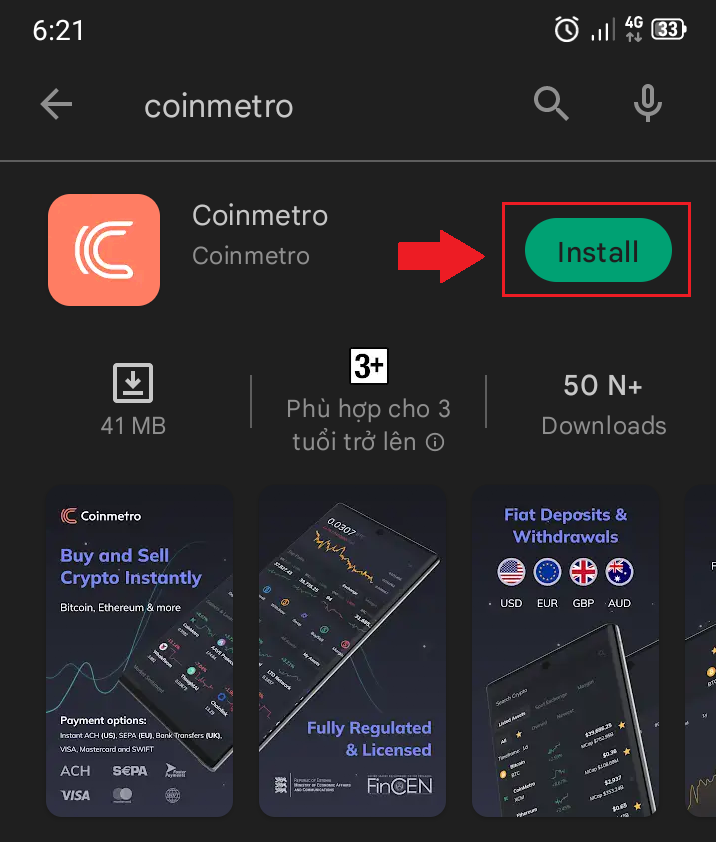
3. Open the app you downloaded to register an account in Coinmetro App.
How to Verify Account on Coinmetro
To comply with the continuously changing international legislation and to safeguard both itself and its clients, Coinmetro has created a profile verification process. You will be protected from legal hazards and will get a more consistent quality of service if you follow the profile verification process.
What proofs of identity do you need to provide to Verify your profile
For us to verify your profile and get you set up for ready trading with us, we will require you to submit a photo of yourself and an acceptable identification document. These photos are captured live with our profile verification software.Acceptable documents for your proof of identity:
- Passports are accepted from any country we are licensed to serve;
- Drivers licenses are accepted from almost all countries, with a few exceptions;
- Identity cards are accepted within most of the European Economic Area and EU countries.
Please note that we cannot accept anything other than the above-listed documents as proof of identification. Your account will show the available options for your country; please do not upload any document other than the options shown.
How to Verify Personal Infomation
1. Visit the Coinmetro homepage, click on the profile icon in the upper right corner and choose [Account] in the menu. Or you can choose [Verify My Account] on the center screen.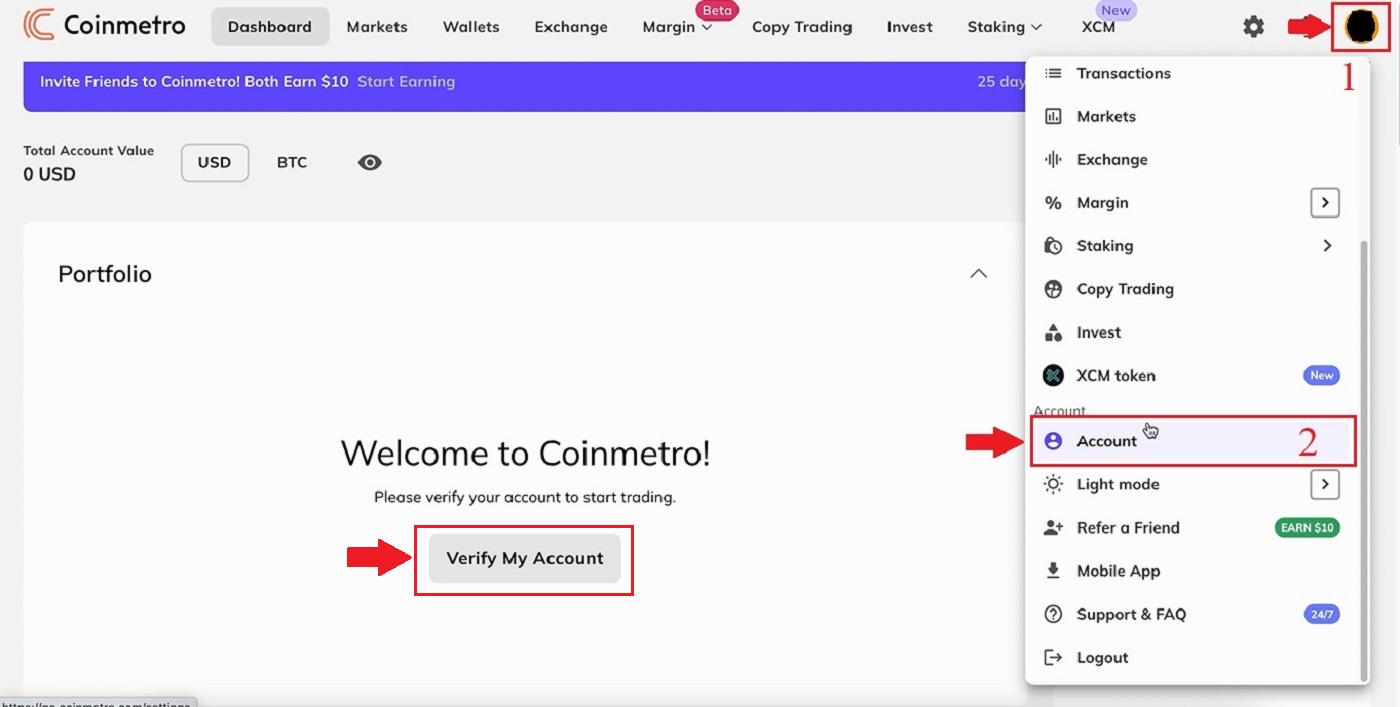
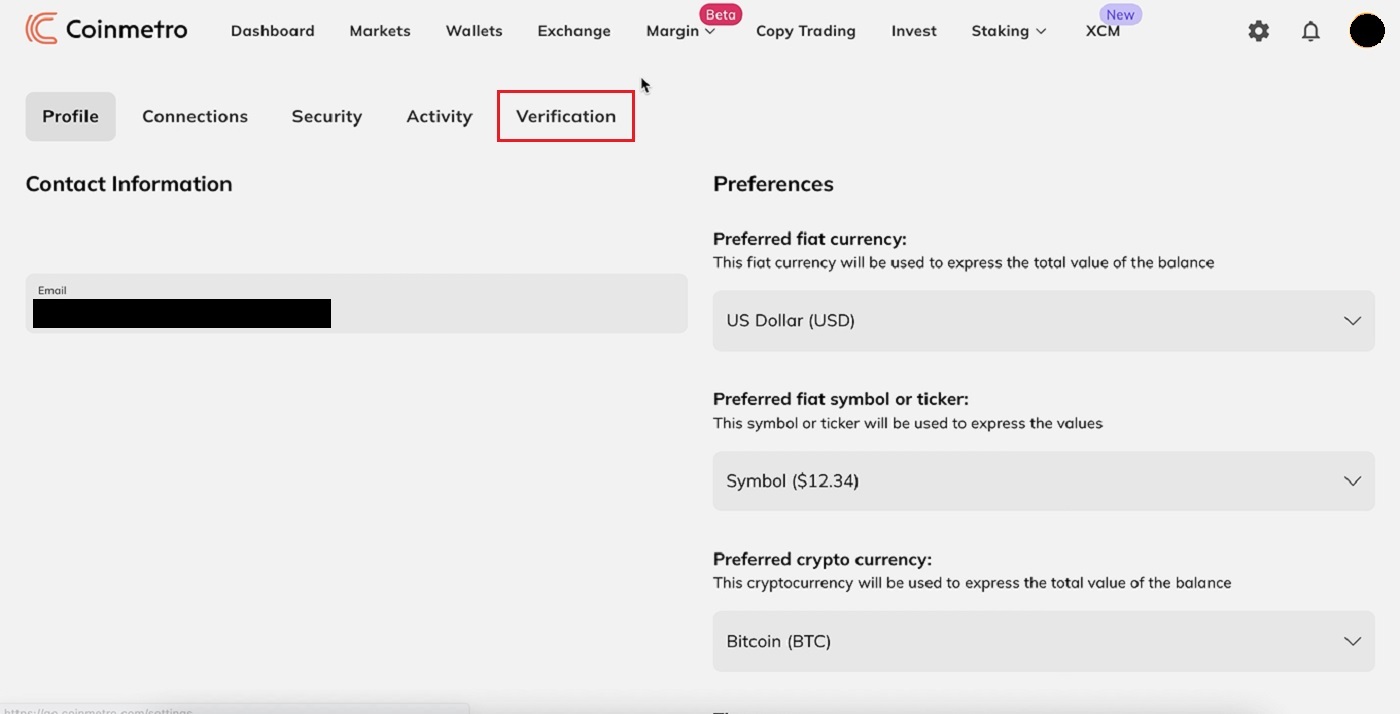
2. Click [Verification] on the page of [Account].
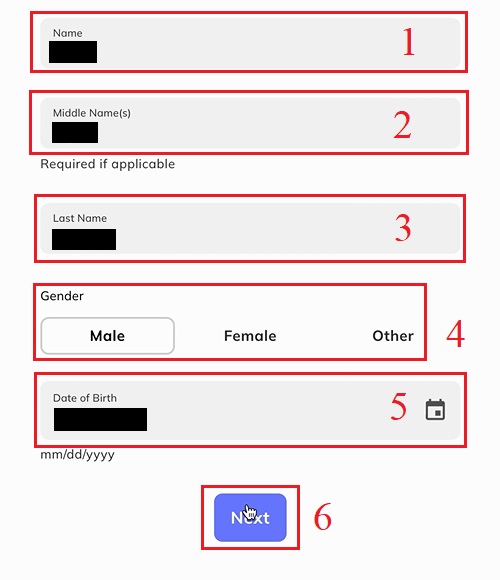
3. Enter all data: [Name]; [Middle Name (s)]; [Last Name]; [Gender]; [Date of Birth] for "Personal Infomation" then click "Next".
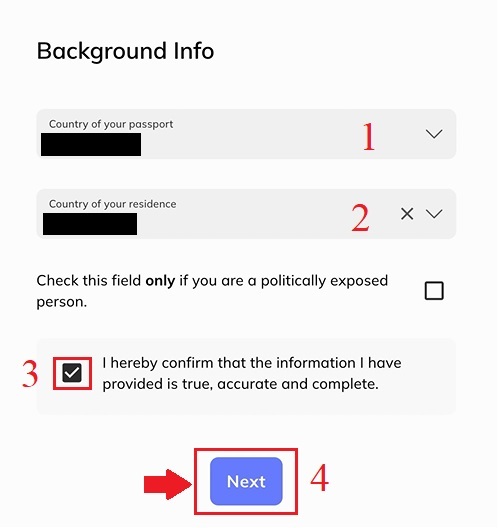
4. Enter [Country of your Passport]; [Country of your residence]. Read the terms of service and choose [I hereby confirm that the information I have provided is true, accurate, and complete] then click "Next".
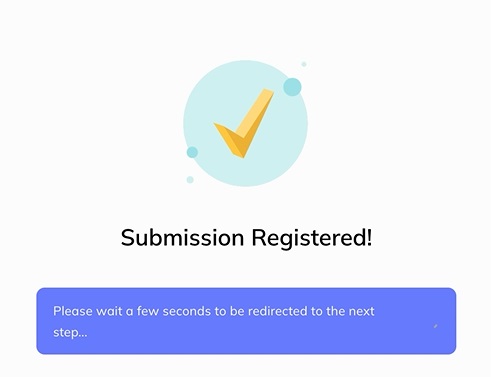
5. Following the steps before, you will finish verifying your account.
How to Verify Identification
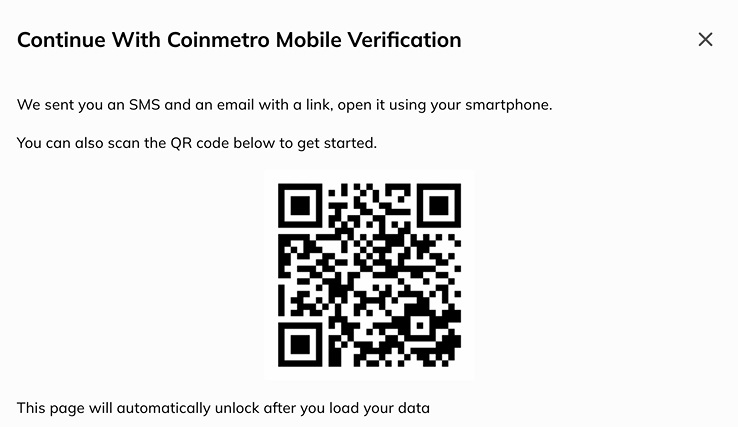
Please note - for additional security you will be prompted to verify this via email and SMS, or by scanning the provided QR code. This page will not unlock until you have done so. The process will then need to be completed on a mobile device or tablet.1. Click [Begin] on the item "Identity Verification".
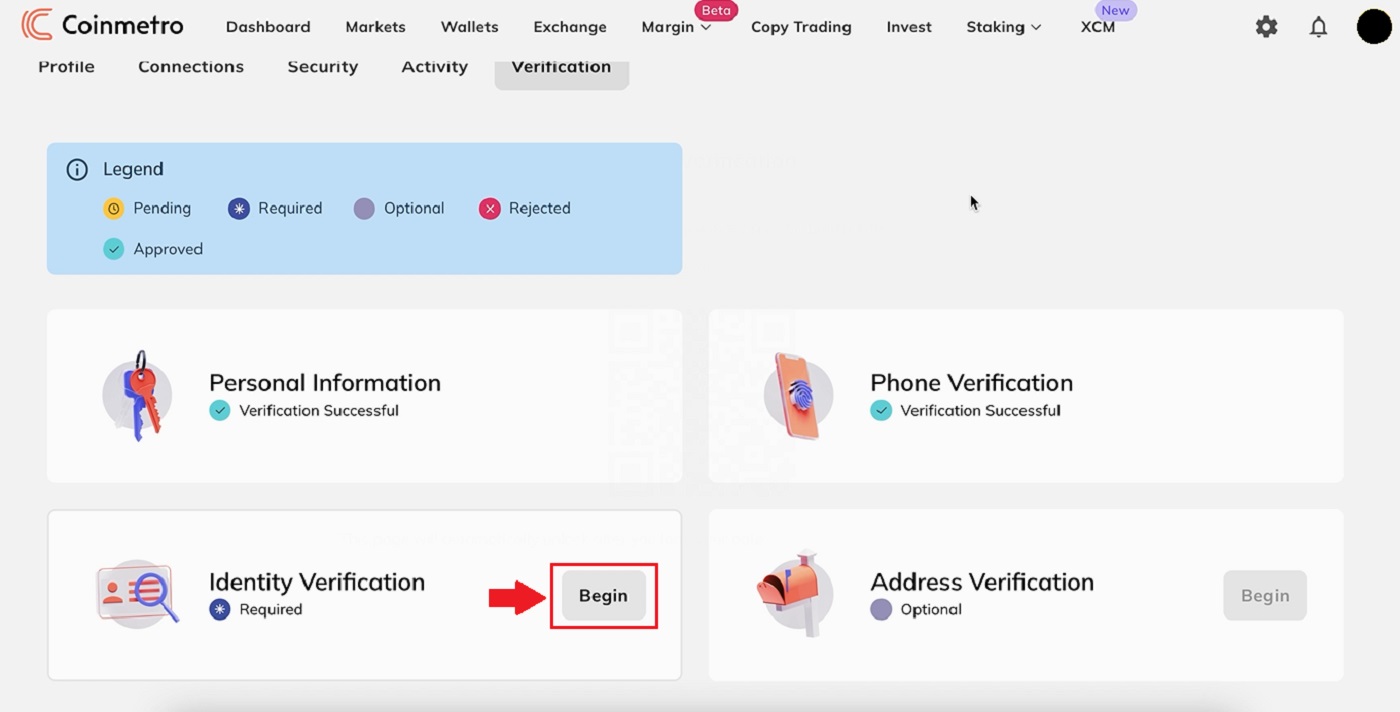
2. The Coinmetro will send you an SMS and an email with a link, open it using your smartphone or you can also scan the QR code below to get started.
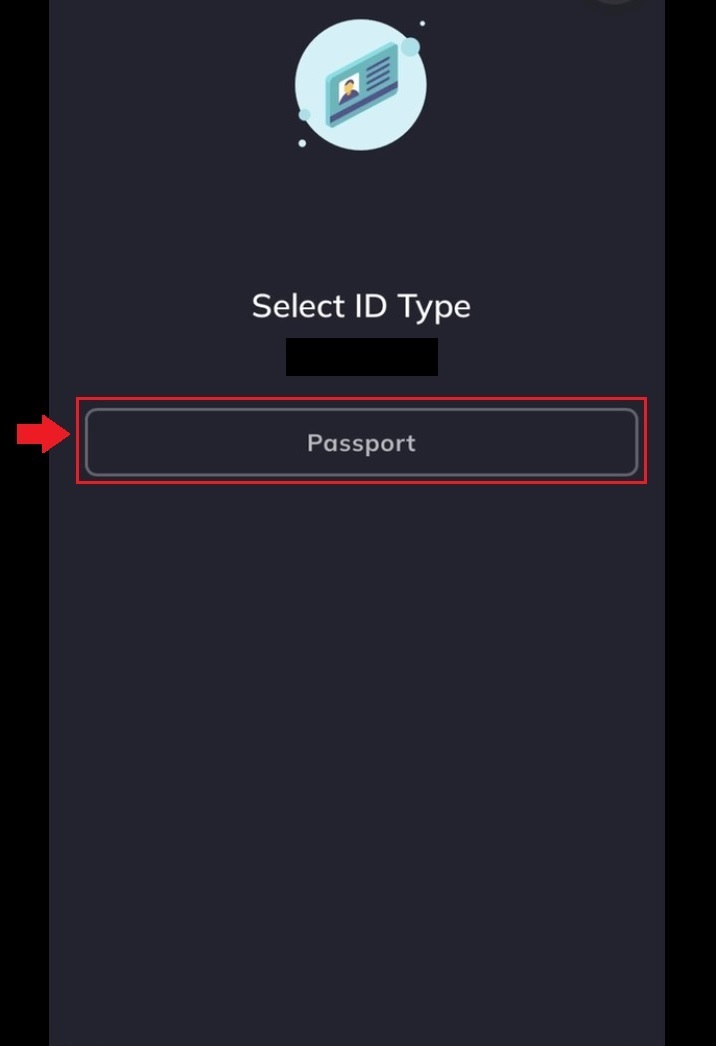
3. Then, click [Passport].
4. Read attention carefully and enter "Passport Details": [Passport Number]; [Date of Expiry] and click "Next".
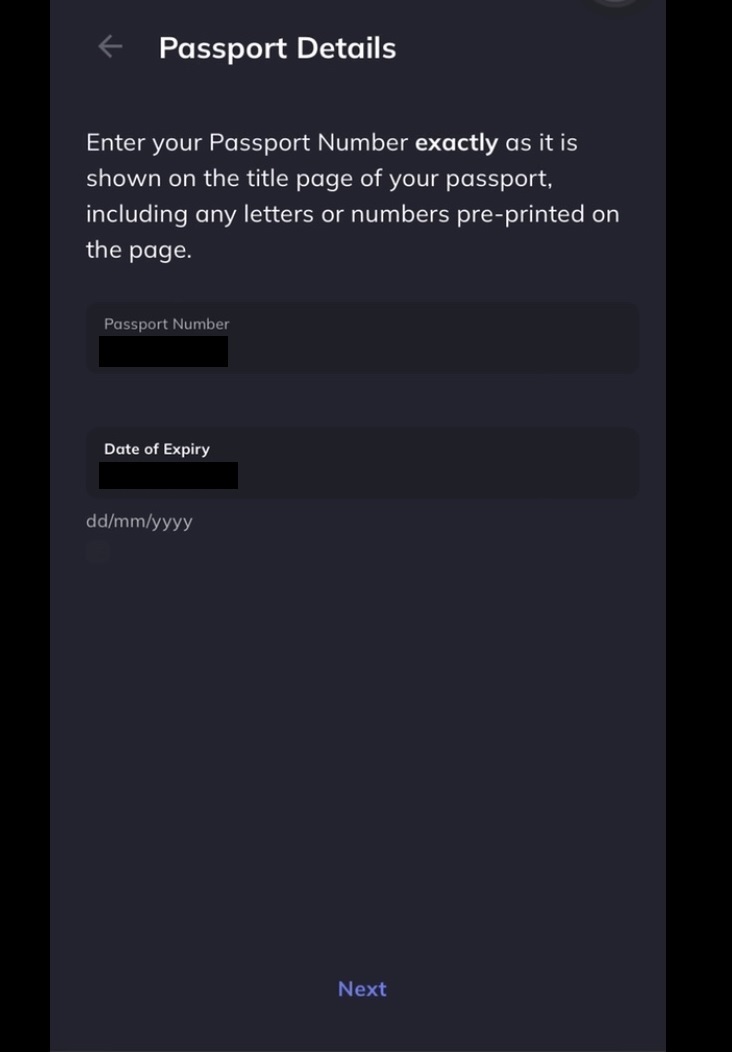
The document used must still be valid at the time of being uploaded. Should the document expire shortly, you will be required to provide an updated document before the expiry date is reached.
5. Choose the description of your occupation and click "Next".
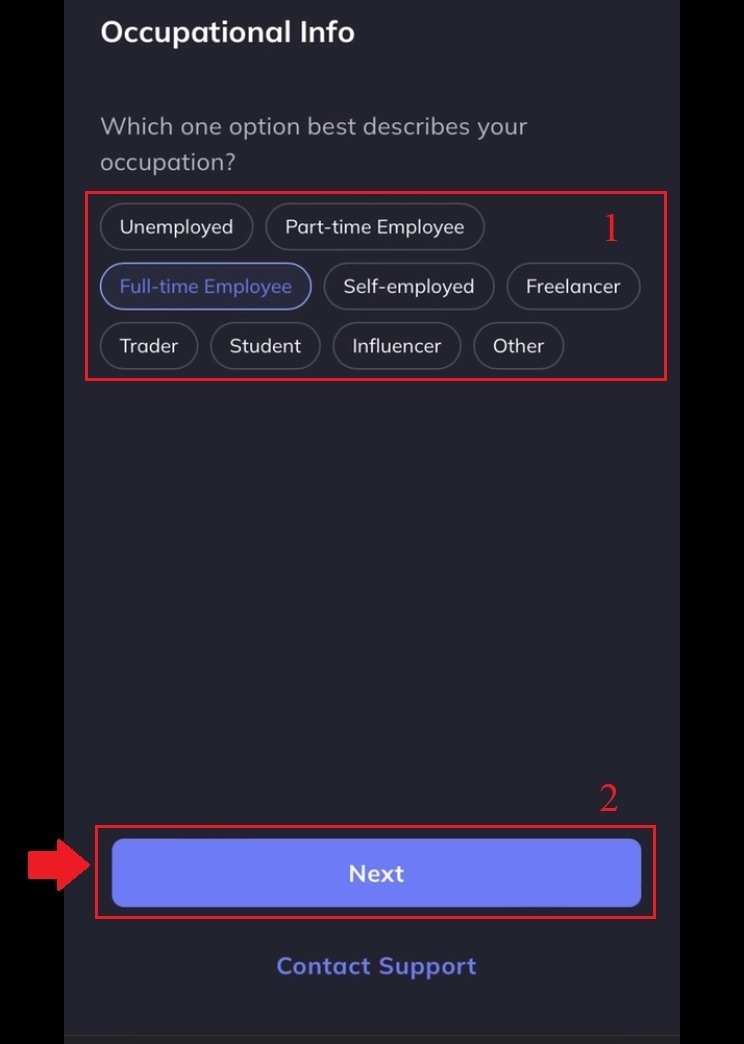
6. Choose to select all that apply, then click [Submit].
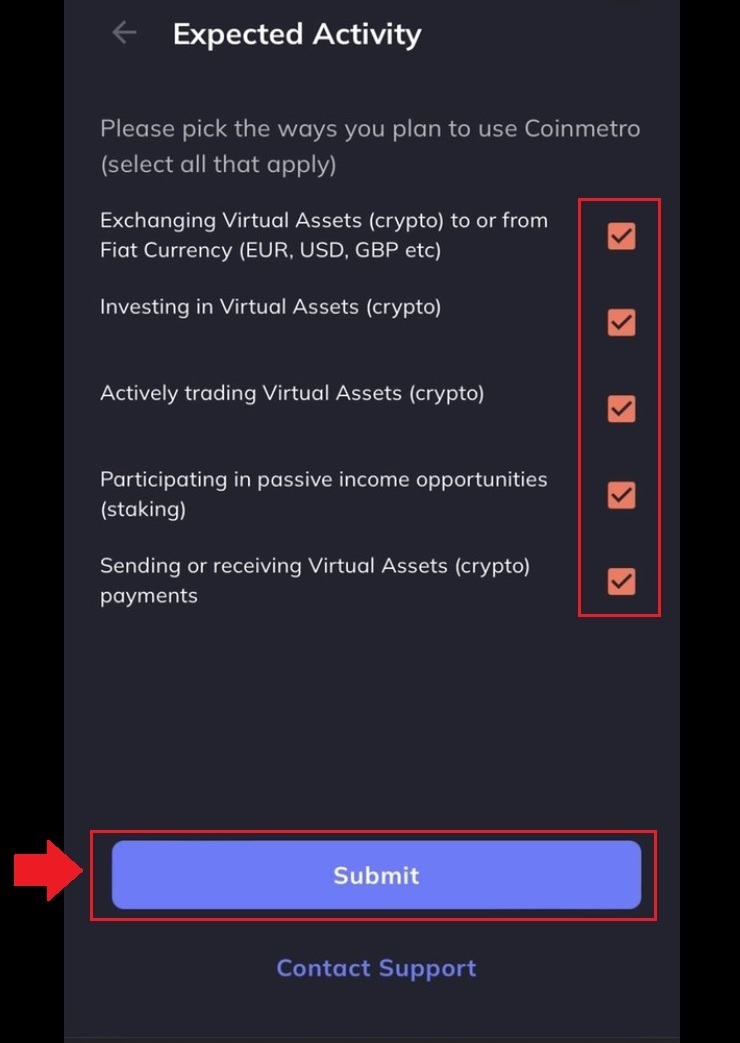
7. Following the steps before, you will finish verifying your account.
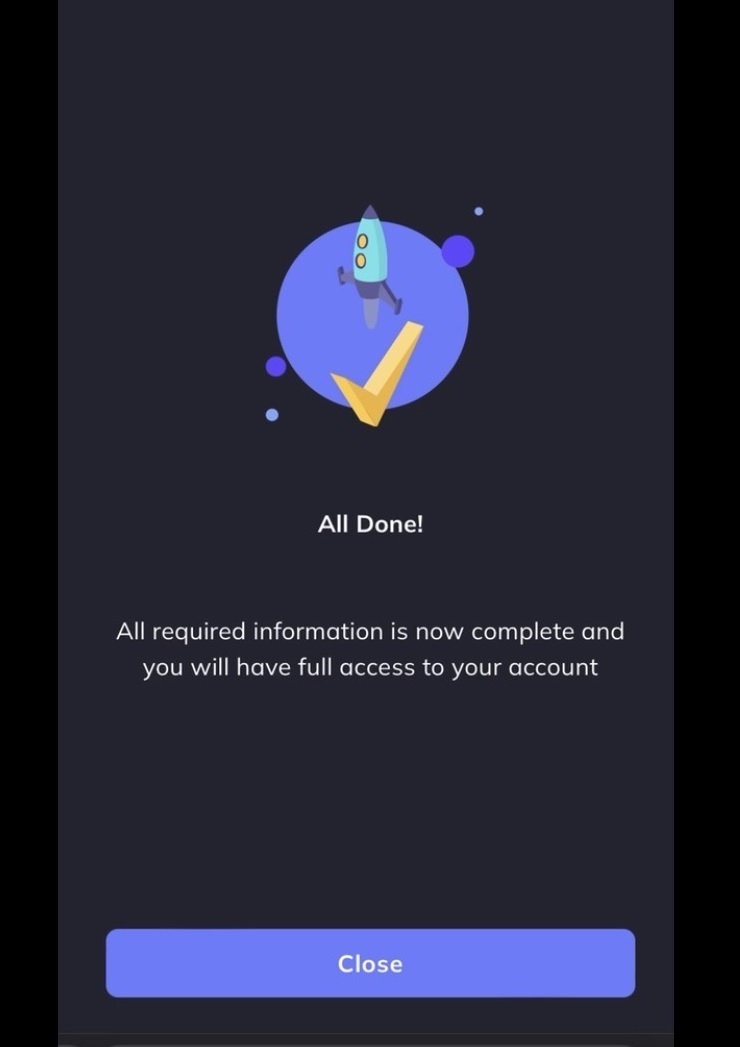
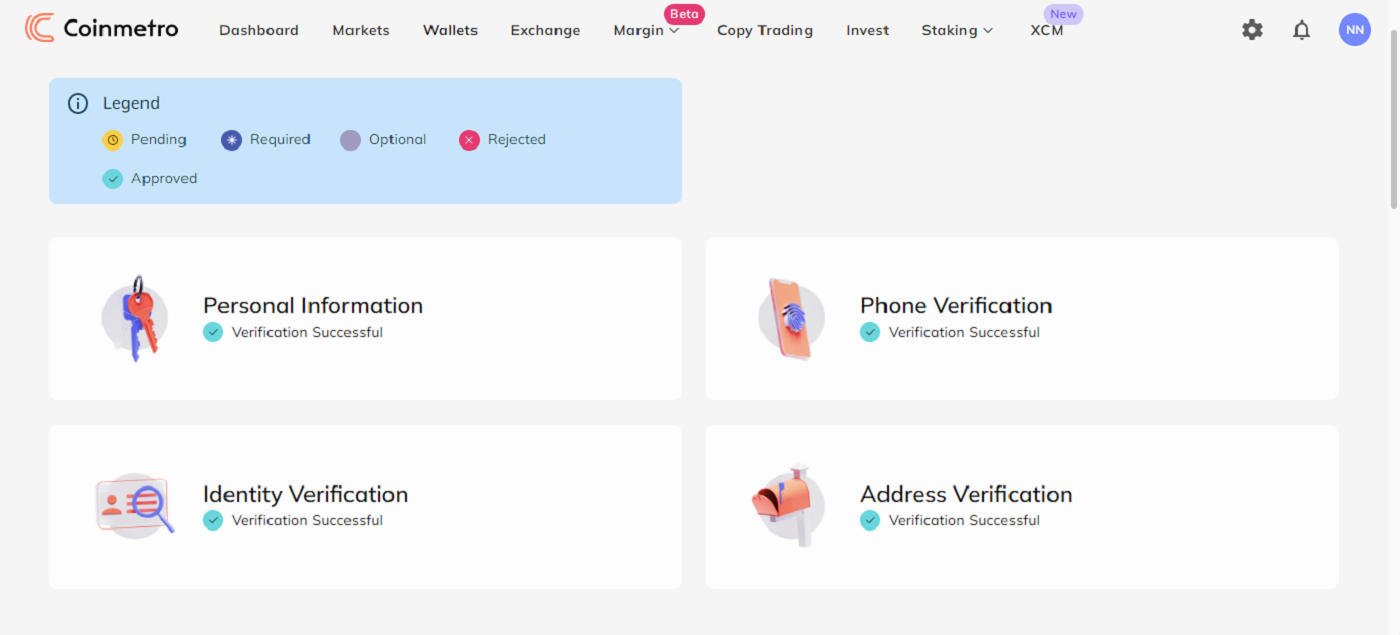
Your account has been verified as below.

How to Verify Number Phone
After completing the verification of the Personal Infomation, the system will redirect to the next step
1. Enter your [Mobile Number] then click "Confirm".

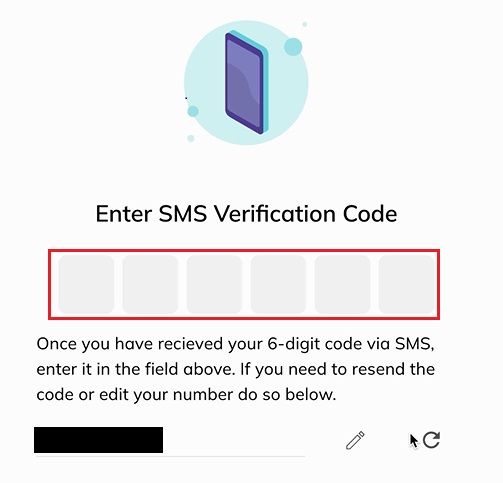
2. Check your SMS, and enter the SMS verification code sent to your phone.
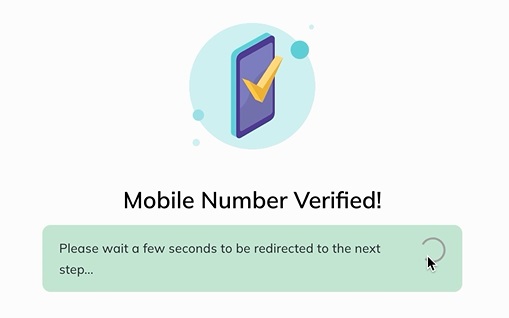
3. Your number phone verification for an account is complete, Please wait a few seconds to be redirected to the next step...
How to Verify Address
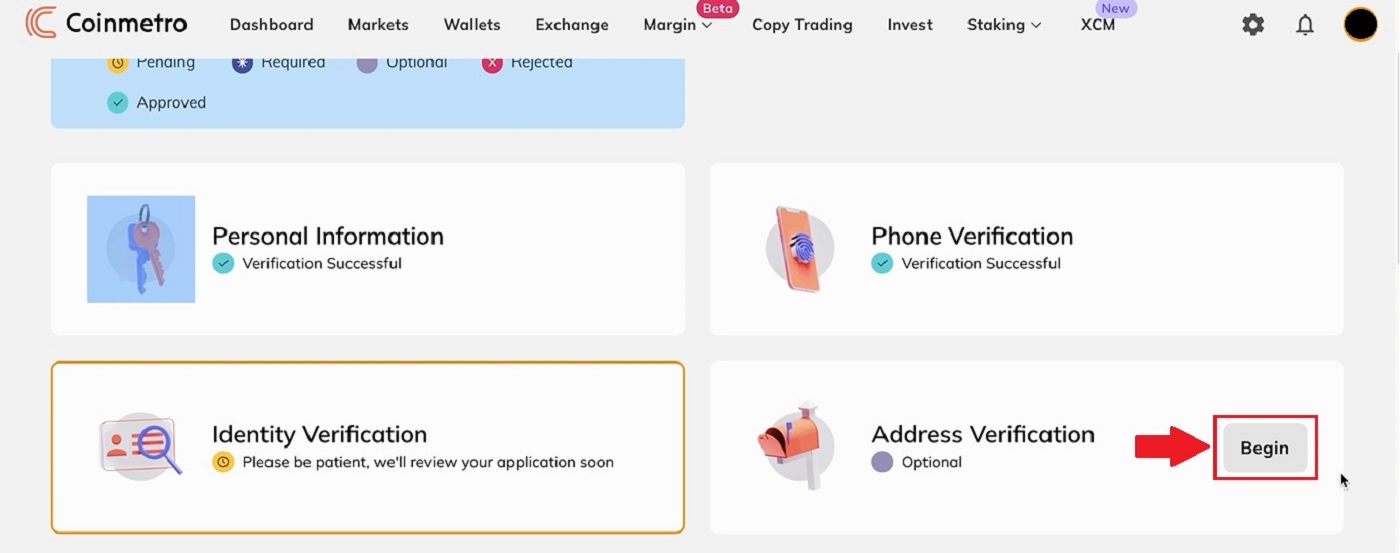
As Coinmetro is a secure and regulated exchange, we require you to provide your full and complete residential address.1. Click [Begin] on the item "Address Verification".
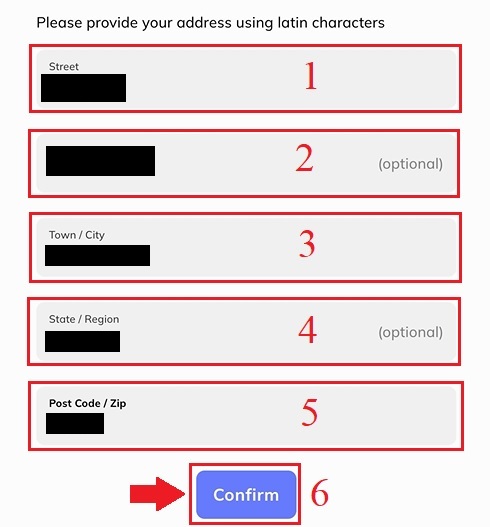
2. Please fill out your current address and click [Confirm].
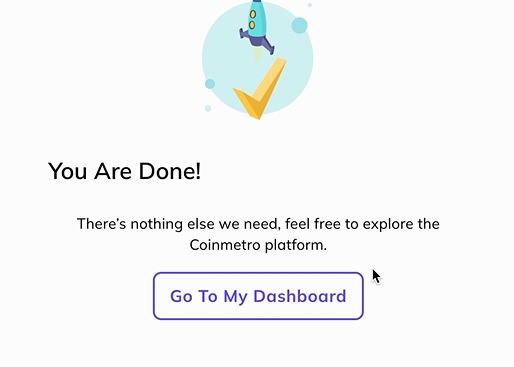
3. Immediately after, click [Go To My Dashboard] you will be directed to the Coinmetro platform.
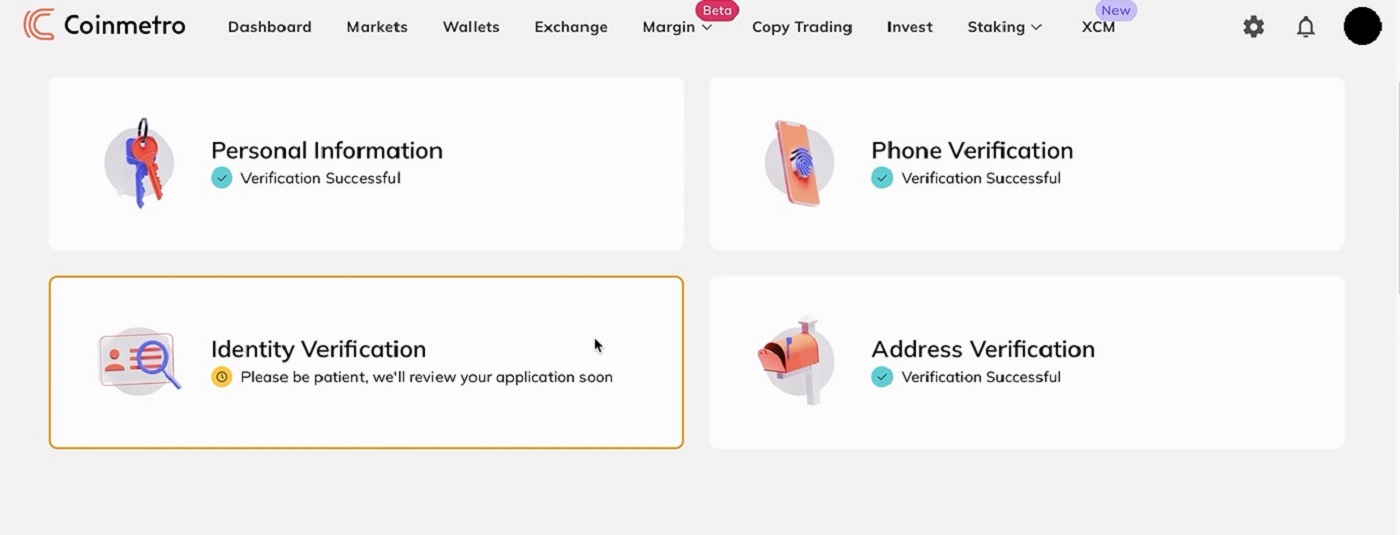
4. Following the steps before, you will finish verifying your account.
How to Deposit on Coinmetro
Deposit Fiat via Credit Card Into Coinmetro
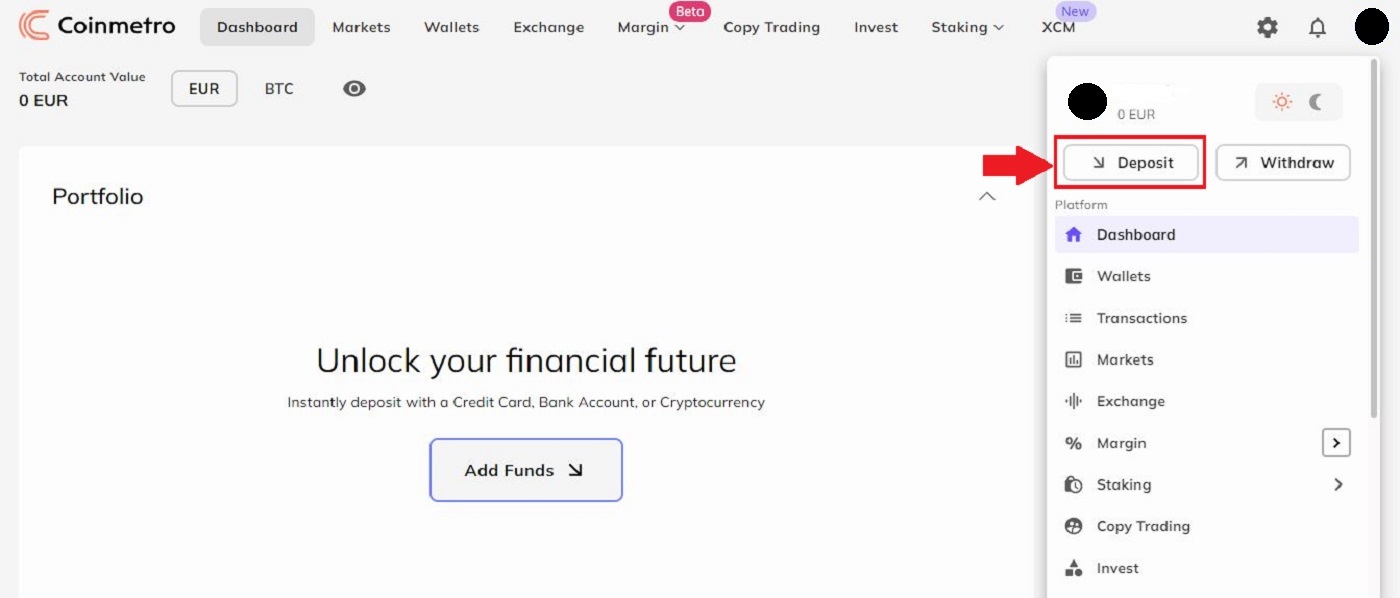
Step 1: Go to the Coinmetro homepage, click on the profile icon in the upper right corner and choose the [Deposit] button.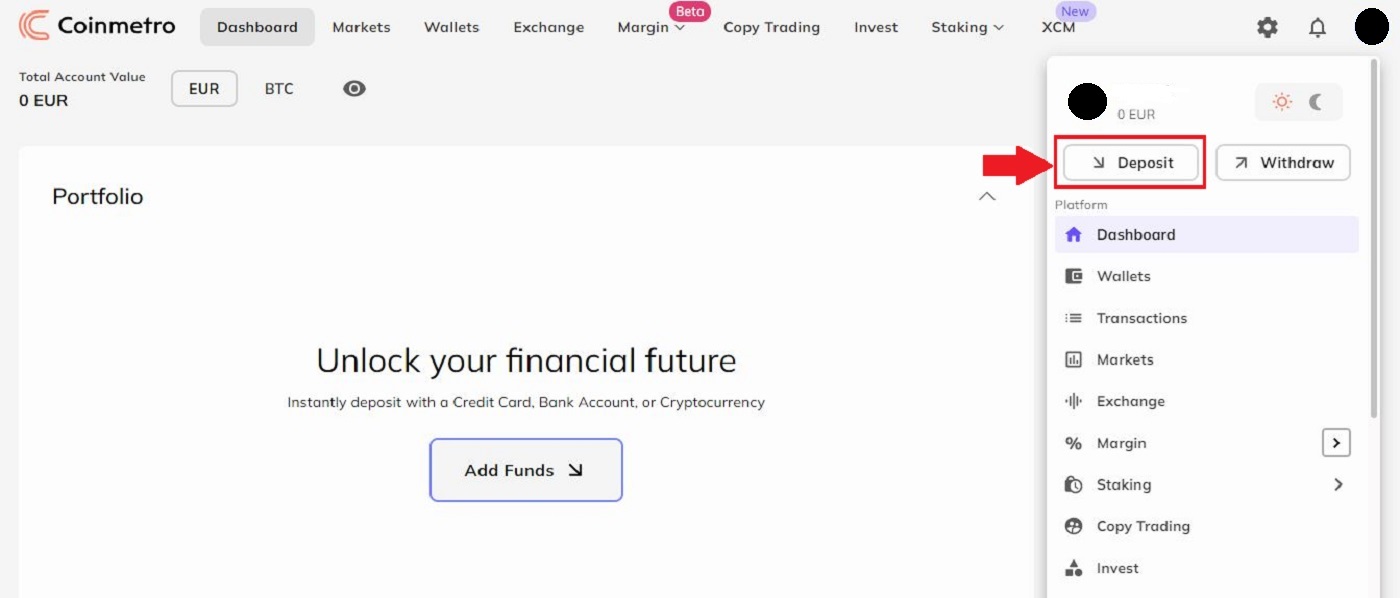
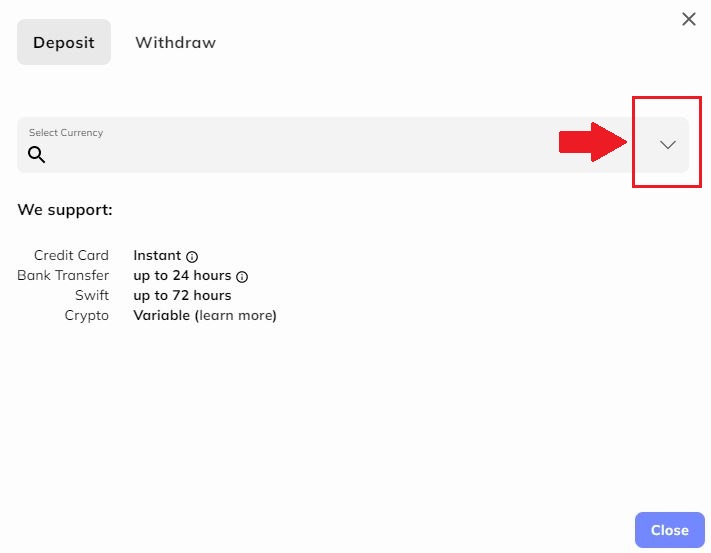
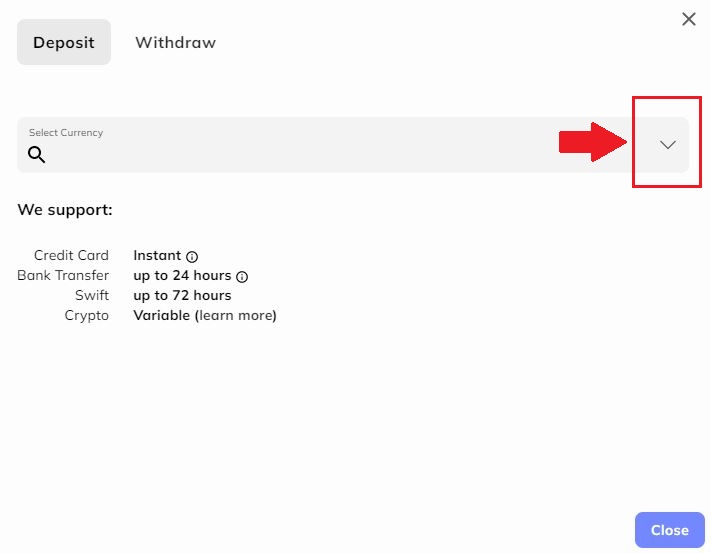
Step 2: Click the down arrow to select the currency you want to deposit.
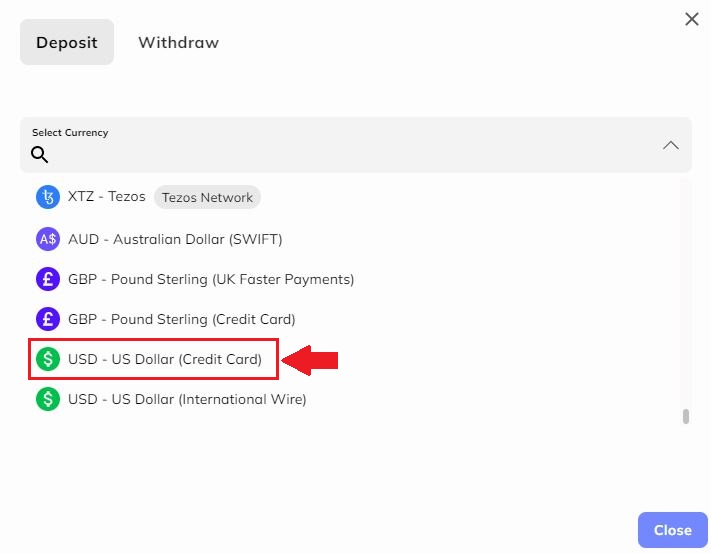
Step 3: For example: If you would like to use a credit card to deposit, please be aware that is 4.99% fee will be included in your amount.
Step 4: Please choose how much you would like to deposit and place it in the Amount section. Click "Next" to continue.
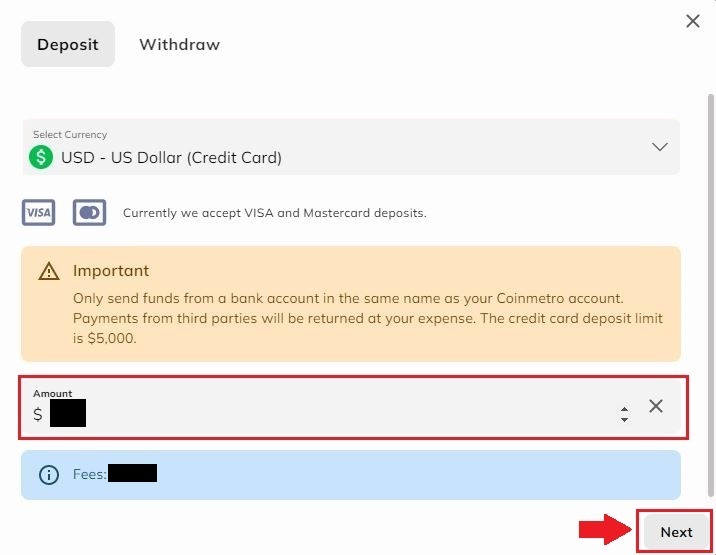
Important note: Only send funds from a bank account in the same name as your Coinmetro account. Payments from third parties will be returned at your expense. The credit card deposit limit is $5000.
We currently only accept Visa and Mastercard.
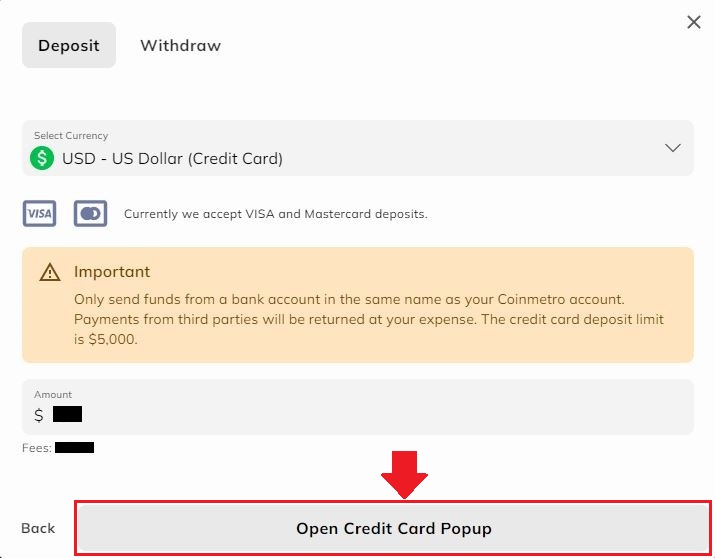
Step 5: Please click on the Open Credit Card Popup tab to continue.
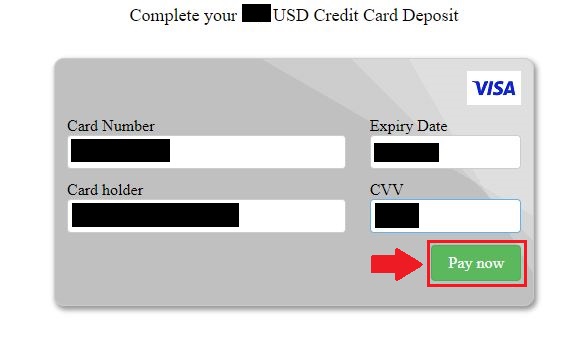
Step 6: Please fill in the information on your card into this window, such as Card Number, Card Holder Name, Expiry Date, and the CVV on the back of the card. Click "Pay Now" to submit and continue. If you would like to cancel, please click on the cancel tab in the bottom right corner of the page.
Deposit Fiat via Bank Transfer Into Coinmetro
To deposit your Euro (SEPA bank Transfer) into Coinmetro, follow these steps.Step 1: Go to the Coinmetro homepage, click on the profile icon in the upper right corner and choose the [Deposit] button.
Step 2: Click the down arrow to select the currency you want to deposit.
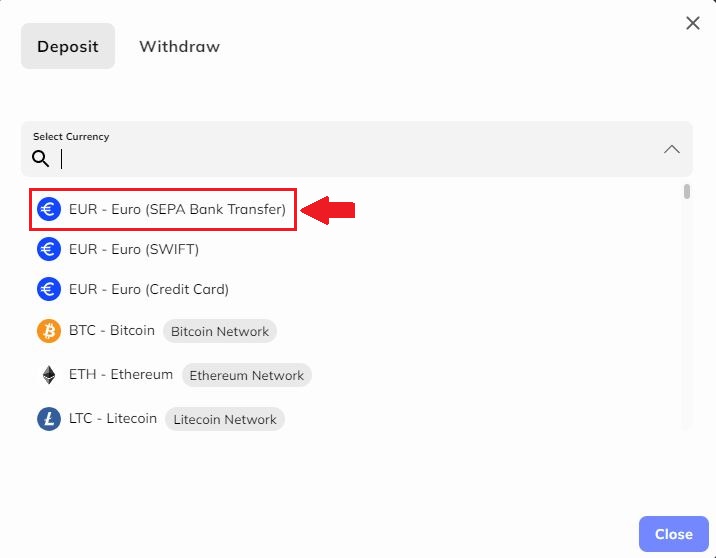
Step 3: Choose EUR - Euro (SEPA Bank Transfer) by clicking on the button as shown.
Step 4: Please fill in your IBANs name into the bar that’s shown on the figure, then click on the "Continue" button.
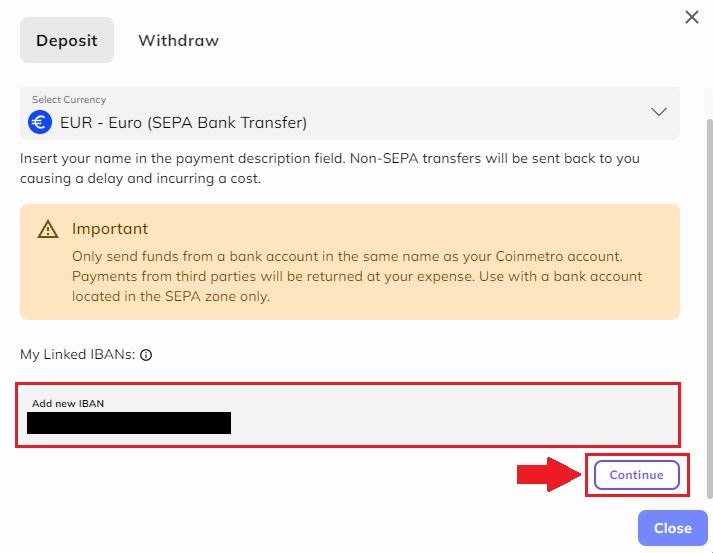
Important: Only send funds from a bank account in the same name as your Coinmetro account. Payment from third parties will be returned at your expense. Use with a bank account located in the SEPA zone only.
Step 5: Continue to Link Your IBANs information by filling in your Linked IBANs and clicking on the (+) Sign. Paying your bank app to this account by copying the address and clicking the rectangle on the right of each line, then paste it to your bank account.
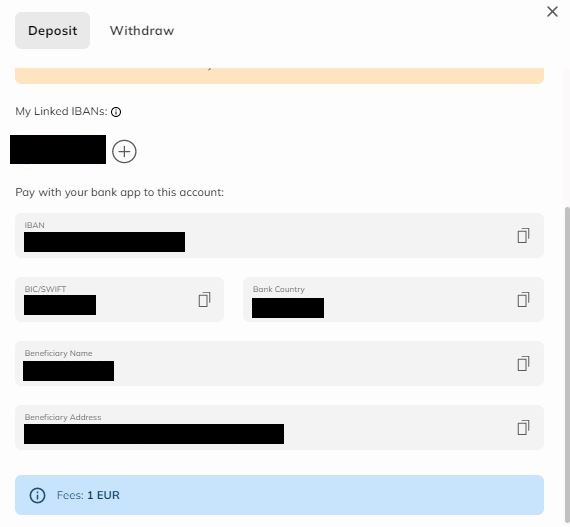
Please be aware the transaction fee for the SEPA bank transfer would be 1 EUR.
Deposit Crypto Into Coinmetro
Step 1: Visit the Coinmetro homepage, click on the profile icon in the upper right corner and choose the [Deposit] button.
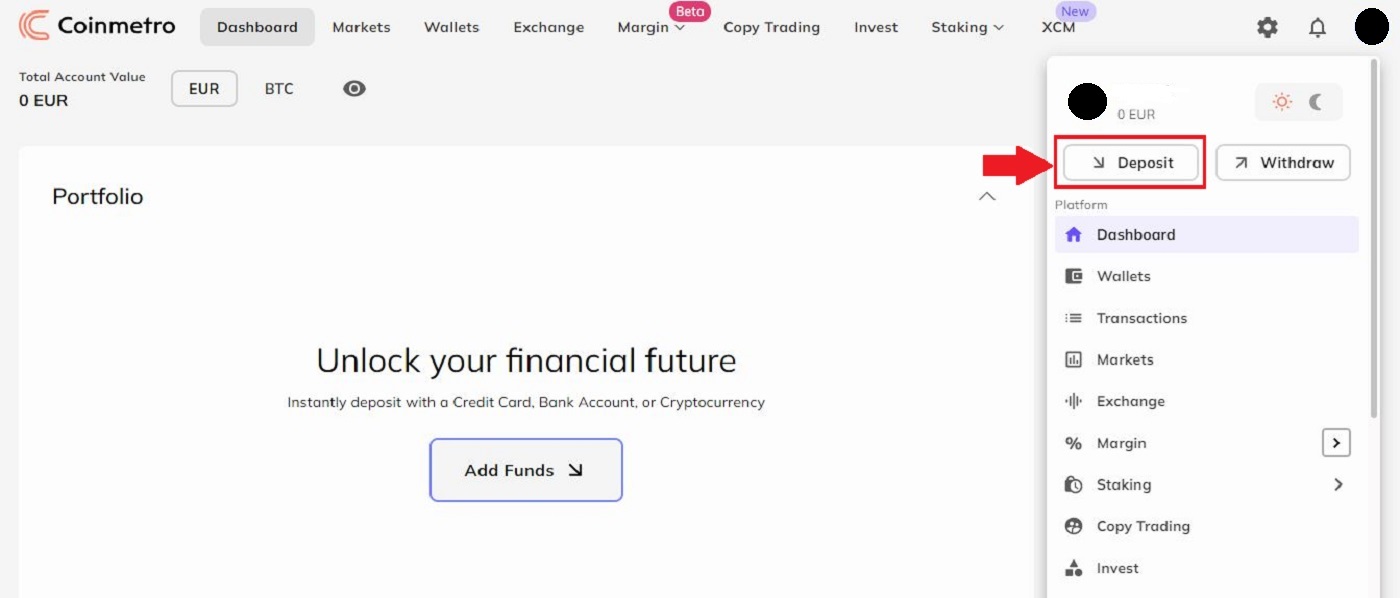
Step 2: Please choose the crypto you would like to deposit. Roll down on the vertical bar to find your best option.
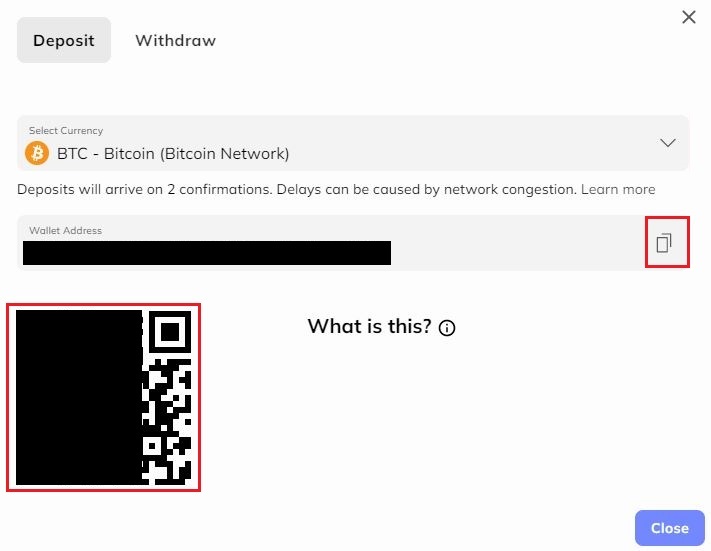
For example, if you choose BTC – Bitcoin, this window will pop up.

Step 3: You can deposit from another broker to Coinmetro by copying this [Wallet Address] by clicking on the two rectangles icon on the right side of the line, then paste it into the withdrawal address field on the external platform or wallet. Or you can scan the [QR code] for this address. To learn more please click on “What is this?”
Ethereum and ERC-20 Tokens
Important: Please make sure to thoroughly read the pop-up notification (shown below) before making a deposit utilizing the ERC-20 method if you are depositing Ethereum or an ERC-20 token.
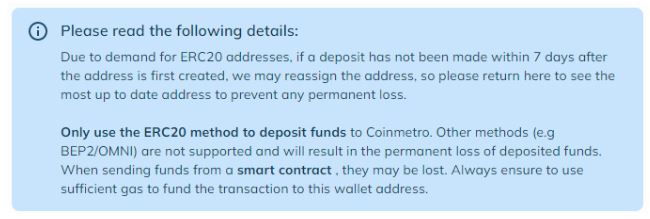
To deposit Ethereum and ERC-20 tokens, Coinmetro uses smart contracts, therefore this results in a somewhat higher gas cost than usual. Setting the transaction gas limit to 35,000 (55,000 for QNT/ETH/XCM) will guarantee the success of your transaction. It doesn’t cost much more. The transaction will be automatically refused by the Ethereum network if your gas limit is too low. An asset loss resulting from a too-low gas restriction is not a concern.
Deposit KDA into Coinmetro
Step 1: Visit the Coinmetro homepage, click on the profile icon in the upper right corner and choose the [Deposit] button.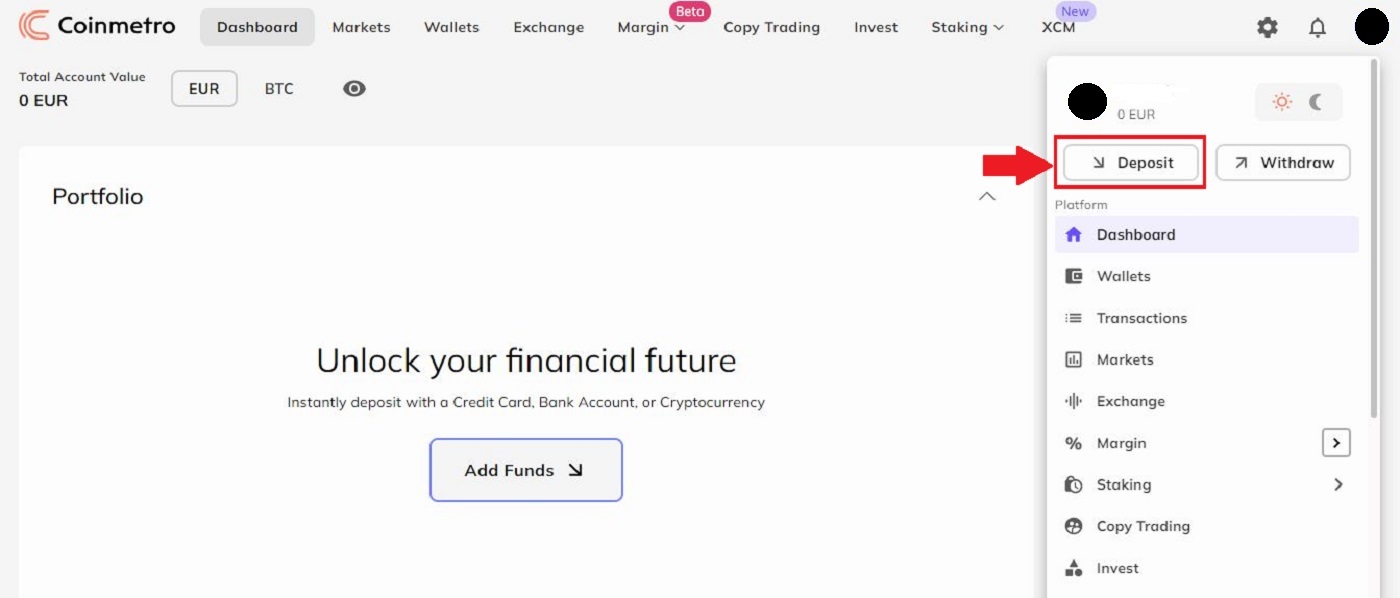
All new users will now have a K: address on their Coinmetro account as a result of the announcement that we support K: addresses. The KDA account address without the ’k’: is still valid for previous users.
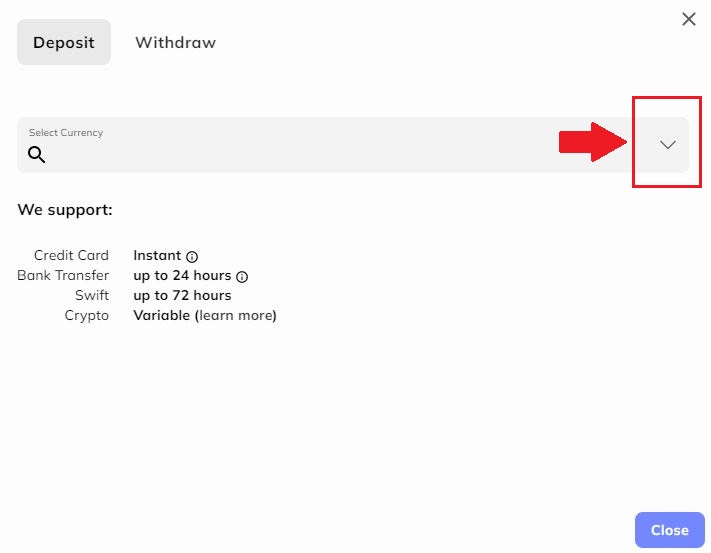
Step 2: Choosing "KDA - Kadena (Kadena Network)"
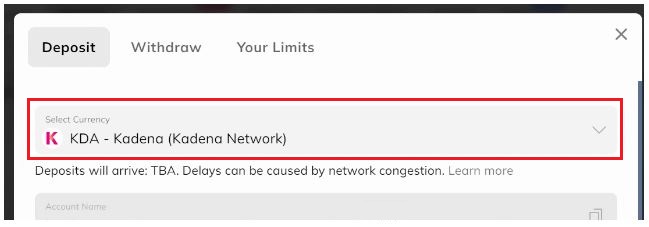
Step 3: You must copy your KDA account number (address) or the TXBUILDER details if you are making a deposit from a Chainweaver wallet into the withdrawal form on the external wallet.
Enter your account number in the withdrawal form for the external wallet and then confirm the transaction
TXBUILDER
The Chainweaver wallet program is where the TXBuilder is primarily intended to be utilized
You will see that you have the choice to copy your account number (KDA deposit address) or TXBUILDER (for Chainweaver wallets) on the Coinmetro deposit form:

You must update your key on each chain if you presently have accounts on several chains and want to use the k: protocol. You may replace your current key fully or just add k: in front of it.
Important note: To make a KDA deposit, you must include the account name. The deposit is assigned to your Coinmetro account according to the account name. The Chainweaver wallet software is the main application for which the TXBuilder is intended. The deposit will not be promptly credited and there will be a delay if you transfer money simply to the key from the TXBuilder. This is because your Coinmetro account is not the only one using the key.
Deposit GBP (Great British Pounds) via Bank Transfer
Step 1: Visit the Coinmetro homepage, click on the profile icon in the upper right corner and choose the [Deposit] button.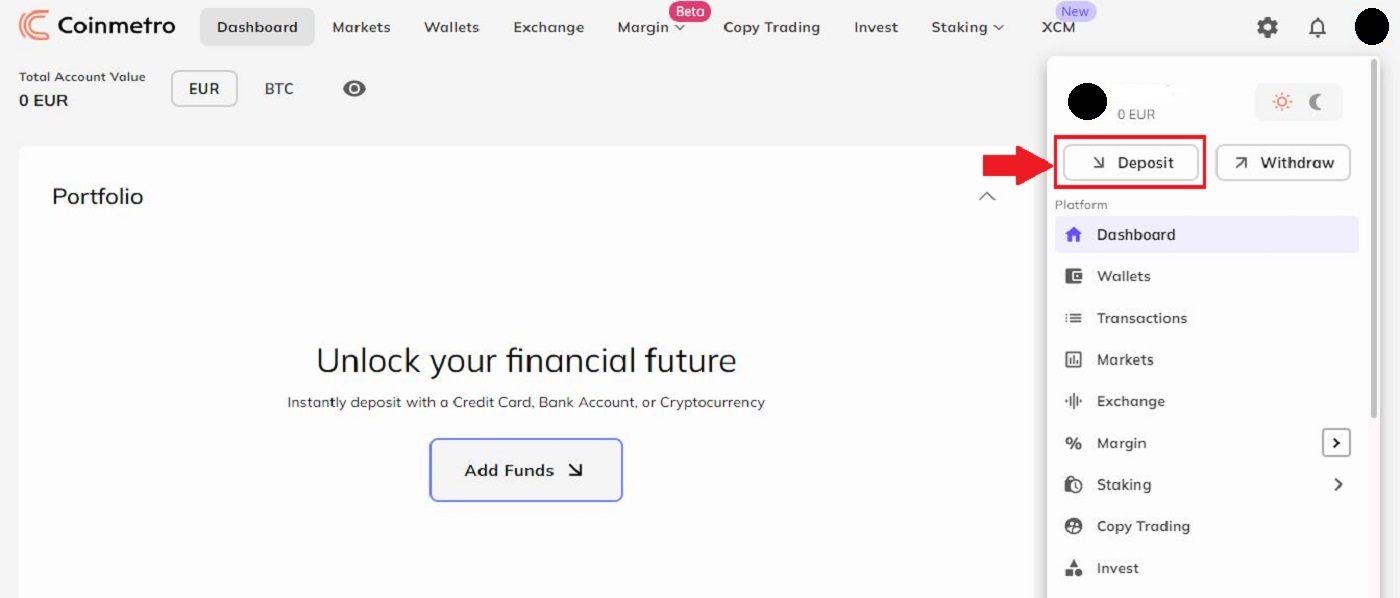
Step 2: Next, pick "GBP - Pound Sterling (UK Faster Payments)" from the drop-down selection.
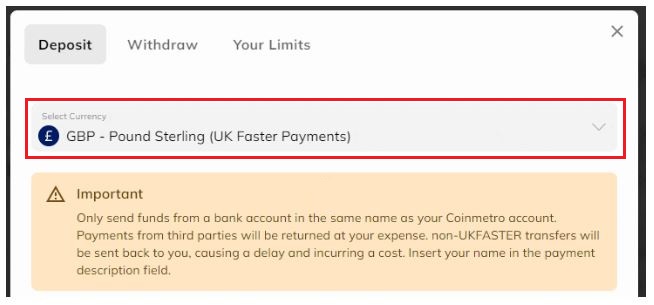
Step 3: Add your sort code and the account number you will be transferring your money from so that our finance staff can quickly link your deposit to your account.
Following the entry of your bank information, click Continue to view Coinmetros banking information. You must transfer money from your online banking or banking app to these addresses, making sure to provide your name in the reference/description area.

Deposit USD via Bank Transfer into Coinmetro
Step 1: Visit the Coinmetro homepage, click on the profile icon in the upper right corner and choose the [Deposit] button.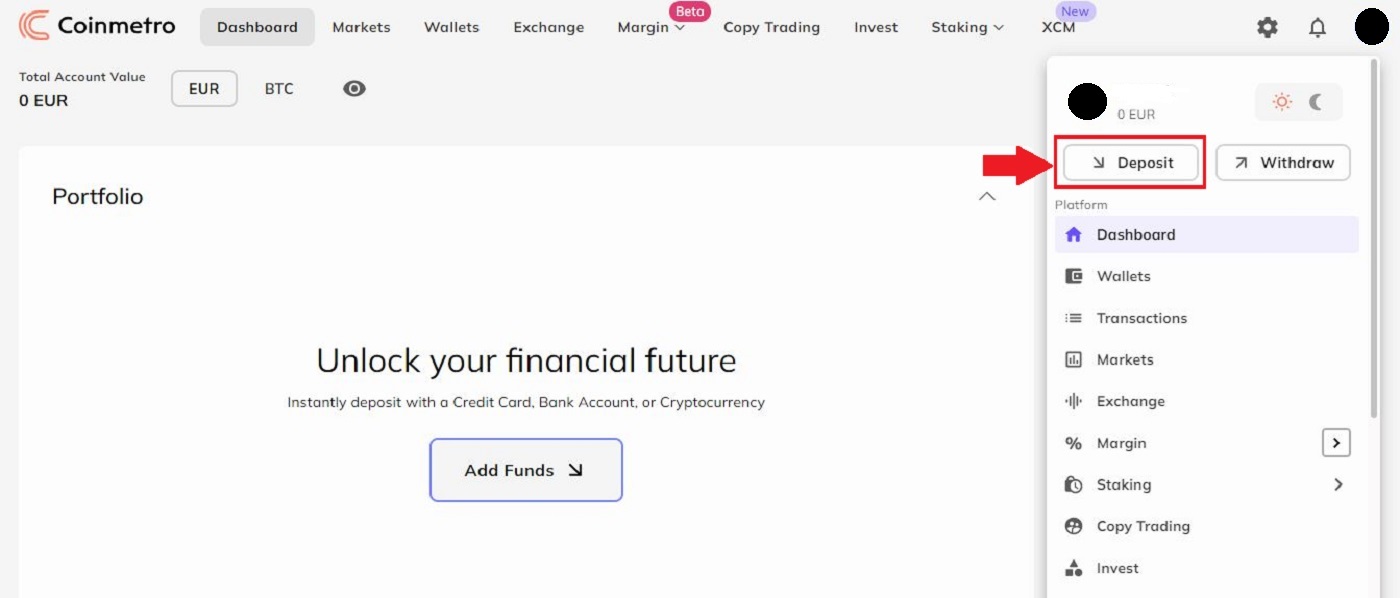
Then look for USD in the dropdown menu. To add USD to your Coinmetro account, you have a few different alternatives to choose from:
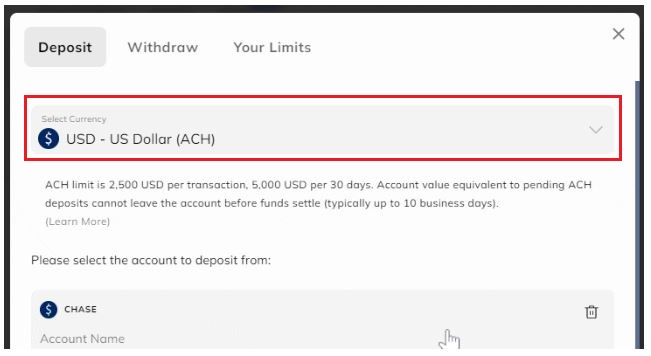
- USD - US Dollar (ACH)
- USD - US Dollar (Domestic Wire),
- USD - US Dollar (International Wire).
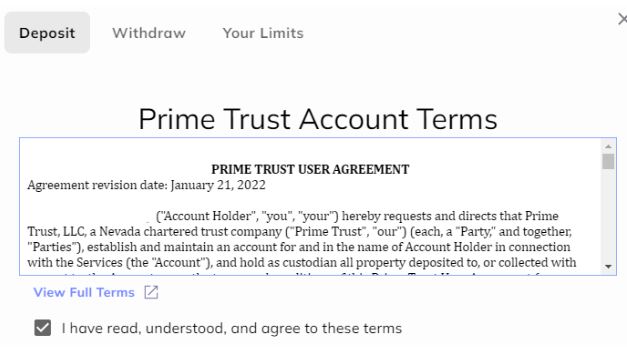
Please be aware that owing to extra checks from our US banking partner, the verification for your first USD deposit may take up to 5 working days to be authorized. Once this is finished, an email will be sent to you.

For Prime Trust to verify your residency, you will also need to submit your Social Security Number.

In the unfortunate event that verification fails, we are unable to manually validate your account, thus you will need to choose another deposit method.
Step 2: Select your withdrawal method.
- For USD ACH Bank Transfer
- For USD Domestic Wire
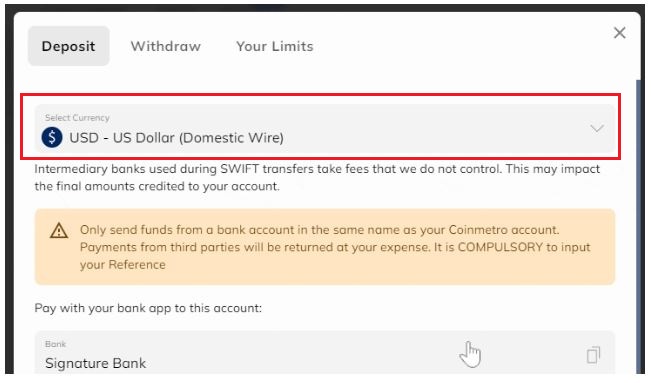
Step 2: You will see a Compulsory Reference in addition to Coinmetros bank information on the USD Domestic Wire Deposit form.
Then, using your full name and the mandatory reference you supplied in the reference/description section while initiating the transfer, you must pay us the money from your bank account. Your reference must be entered for our banking partner and the finance staff to quickly transfer the monies to your account.

Use the bank information supplied for Coinmetro as shown on the USD Domestic Wire deposit form, and verify each time you transfer money. Details may occasionally change as we add additional banking partners.
Deposit Euro via SWIFT into Coinmetro
To deposit your Euro (SWIFT) into Coinmetro, follow these steps.Step 1: Go to the Coinmetro homepage, click on the profile icon in the upper right corner and choose the [Deposit] button.
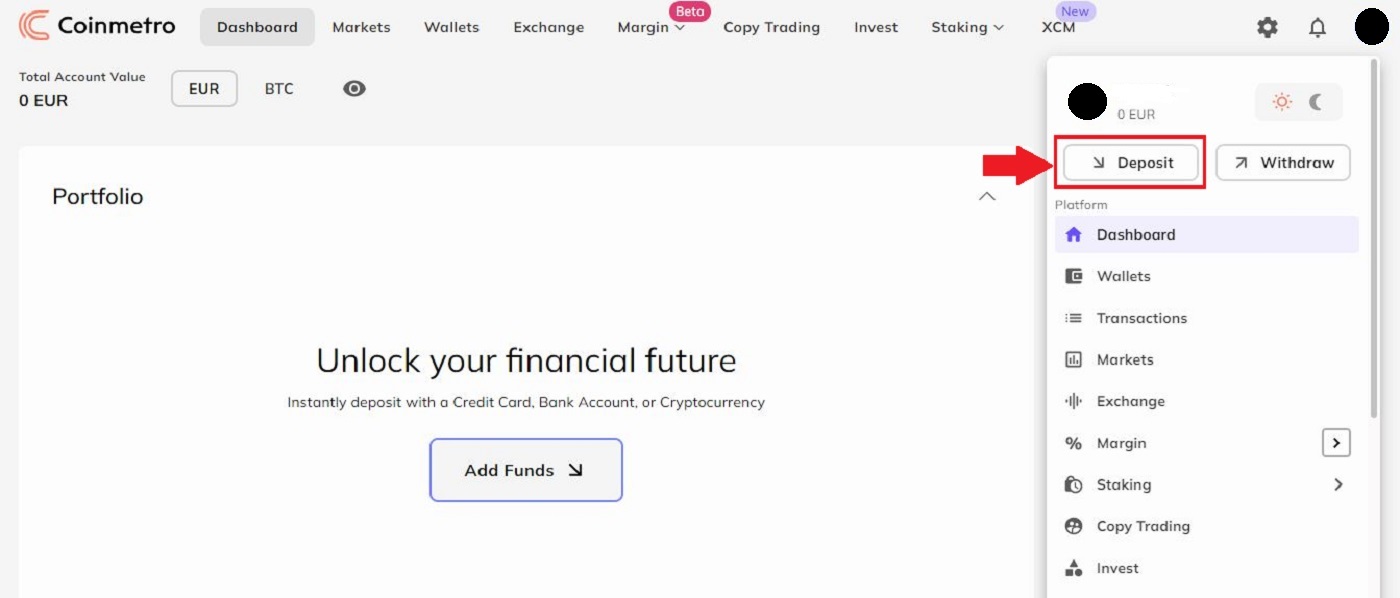
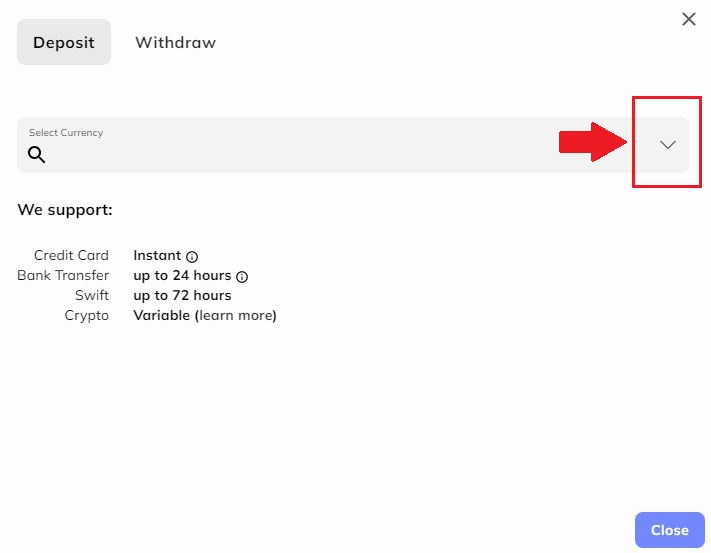
Step 2: Click the down arrow to select the currency you want to deposit.
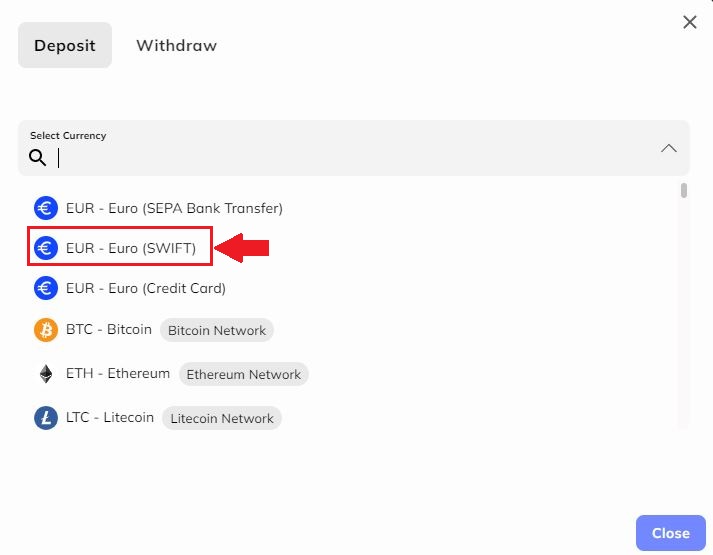
Step 3: Choose EUR - Euro (SWIFT) by clicking on the button as shown.
Step 4: Continue to link your SWIFs by copying the "Bank Name", "Beneficiary Account Number", "Bank SWIFT", "Bank Country", "Bank Address", "Your COMPULSORY Reference", "Beneficiary Name", and "Beneficiary Address" icons by the right of each line, and paste them to your current bank account.
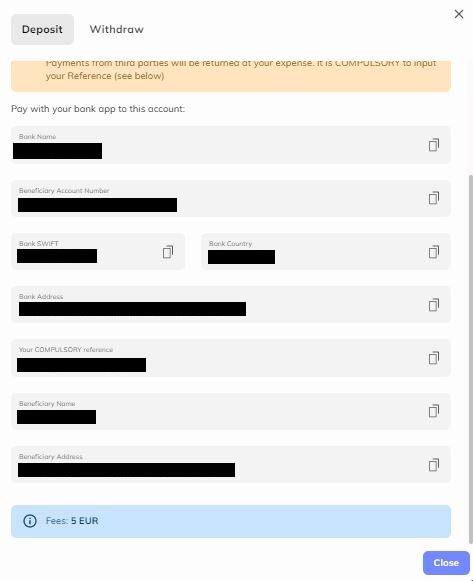
Please be aware the transaction fee for the SWIFT deposit would be 5 EUR.
Important: Only send funds from a bank account in the same name as your Coinmetro account. Payment from third parties will be returned at your expense. It is COMPULSORY to put your reference.
How to Trade Crypto on Coinmetro
Getting Started with the CoinMetro Exchange Platform
The CoinMetro Exchange Platform offers more precision and more control over trading than the Dashboard Swap Widget.If you would like to start trading with more precision than just buying and selling, or if you’d just like a quick breakdown of CoinMetro’s Exchange platform, you’ve come to the right place!
The CoinMetro Exchange Platform can be accessed by selecting the Exchange tab from either your CoinMetro Dashboard or the Markets page.
How to find your active limit order on the CoinMetro Exchange Platform.
On Desktop
Click on the ’Exchange’ tab at the top of the screen.

On the Coinmetro Mobile App
Click on ’More’ in the bottom right-hand corner, then ’Exchange’ from the side menu.

Why use the Exchange Platform?
When using the Dashboard Swap Widget, you can very easily buy or sell cryptocurrency at a fixed price, making it perfect for quick trades at the best available price. The Exchange Platform instead offers much more precise trading, placing orders at various price points to be traded in the future, and more:
- Buy or sell at the best available price, just like Dashboard Swap Widget (Market Order),
- View price charts with built-in trading indicators,
- View order books for all orders for trading pairs, showing at what prices other traders are looking to buy or sell,
- Place Limit Orders, allowing you to place an order to be filled at a specific price,
- Place Stop Orders to limit losses in case the market moves against you,
- See an easy overview of your pending and previous orders.
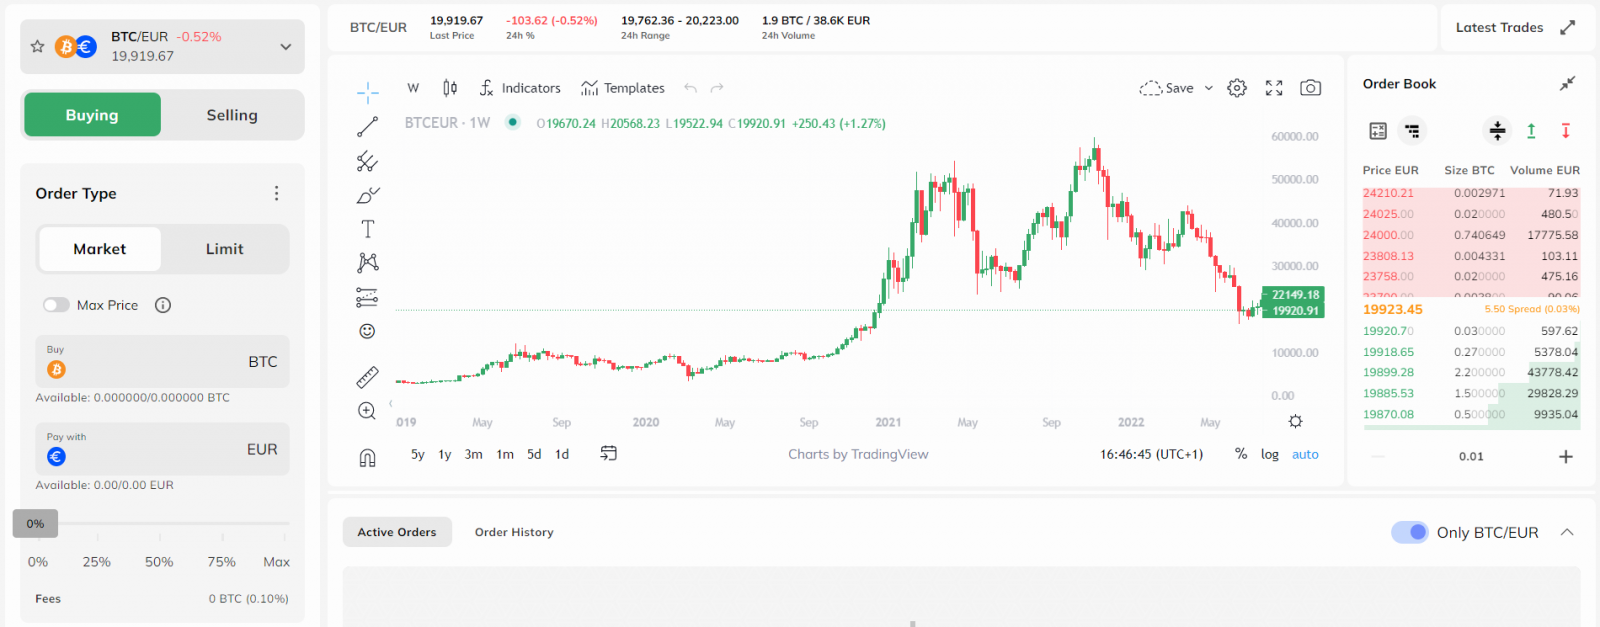
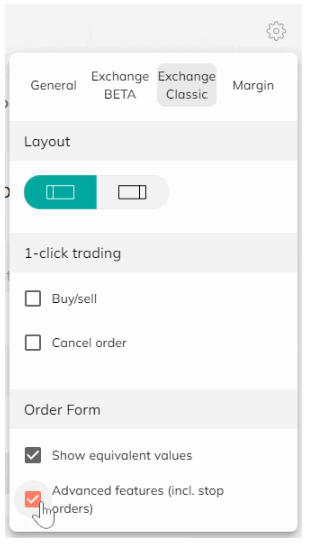
Please note that to enable stop orders and finer order control such as allowing partial fills, this must be enabled from the settings menu, available via the cogwheel.
Price Warnings
Following our recent platform update, our effort to improve your trading experience is continuing with the introduction of a new Price Warning feature. The Slippage Warning Dialog is there to show you in real time if any of your orders could lose more than 3% due to slippage. This is an important component of your trading arsenal, as it will warn you immediately before confirming orders. Use this to your advantage, so you can be aware, act fast and stay on top of the markets.
The Price Warning Dialog shows up if the user submits an order which could lose more than 3% due to slippage. The mechanism works like this:
- No warning is shown when slippage is under 3.00%
- It shows a green warning from 3.00% to 4.99%
- It shows an orange warning from 5.00% to 9.99%
- It shows a red warning from 10.00%+
- The calculation takes the size of the order into account and adjusts the slippage warning percentage accordingly
- It will appear when placing a new market/limit order or editing an open order
- It will appear on both the Exchange and Margin platforms.
- Take spread into account (for now)
- It will not appear when doubling or closing a % of Active Positions on Margin (for now).
Exchange Platform Order Types
When placing an order on the Coinmetro Exchange Platform, you may have noticed that you will have the option to place market orders, limit orders, and for advanced traders, stop orders.Market Orders
Market orders are the most basic buy and sell trades, where a user places a trade order which then will be filled at the price this is currently going for in the book. When placing a market order, you are opting for whatever price the asset is currently going for, so the trade will be filled rather quickly. For example, if placing a market sell order, this means that the asset will sell for whatever a buyer is bidding for in the books. Please be mindful that the price displayed before executing the order may not be the price that your asset sells for.

Coinmetro offers the option to apply for price protection on your market order when checking the ’max/min’ slider. This will ensure that your market order is not filled below or above the specified price. If you would like more fine-grained control of your market order you can use this setting. Please note, the possibility to use this feature is dependent on liquidity.

Limit Orders
A limit order is an order instruction to buy or sell an asset at a specified or better price.
Typically, each pair in exchange has its own order book. An order book contains the limited orders that other users have placed in the book.
When a limit order is placed, it will remain in the order book until it is matched with another order. Using limit orders, a trader can specify the price at which they would like to buy or sell the asset. Please note that there is no guarantee that other traders will match you at your price.
Why are Limit Orders advantageous?
Limit orders are advantageous as they give users more control over the buying and selling prices of their trades. When placing an order to buy an asset, a maximum acceptable purchase price must be selected. When selling an asset, a minimum acceptable sale price must be selected.
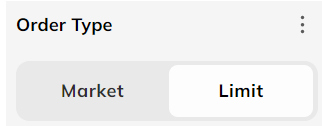
A limit order when buying an asset ensures the user that the buy price will not exceed any higher than the amount selected. When placing a sell limit order, this of course would mean that the sale price would not execute any lower than the amount selected.
This gives users more control over their orders placed, however, please be mindful that limit orders are two-sided, meaning that another user would need to buy or sell at your specified price for it to fill.
Stop Orders
A stop order, or ’stop-loss’ order, is an order to buy or sell an asset once the price of the asset reaches a specified price, known as the stop price. When the stop price is reached, a stop order becomes a market order. A buy-stop order is entered at a stop price above the current market price.
Stop orders can be used to manage markets moving against you. For example, if you were to set a stop order to sell BTC at a minimum price of 40,469, it will automatically be sold at the market price once the price of BTC reaches 40,469.
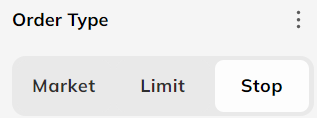
It is possible to combine limit and stop orders, to automatically place a limit order when the stop price is reached. On Coinmetro’s Margin Platform, you can set a stop price for your positions, which will automatically close your positions at market price, if the latest traded price reaches the stop price.
How to Buy Crypto on Coinmetro
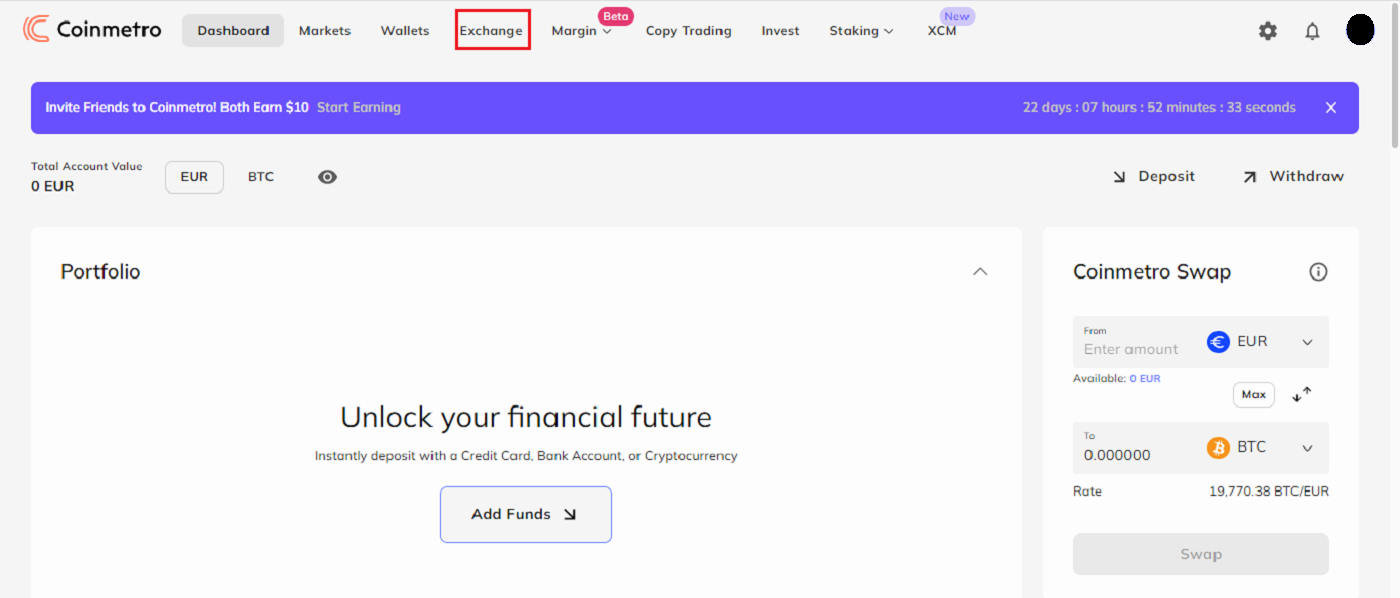
After signing in to Coinmetro:1. Visit the Coinmetro homepage, Click on the Exchange tab to purchase or sell crypto.
2. Then choose the crypto to exchange. Here, we use BTC/EUR as an example.
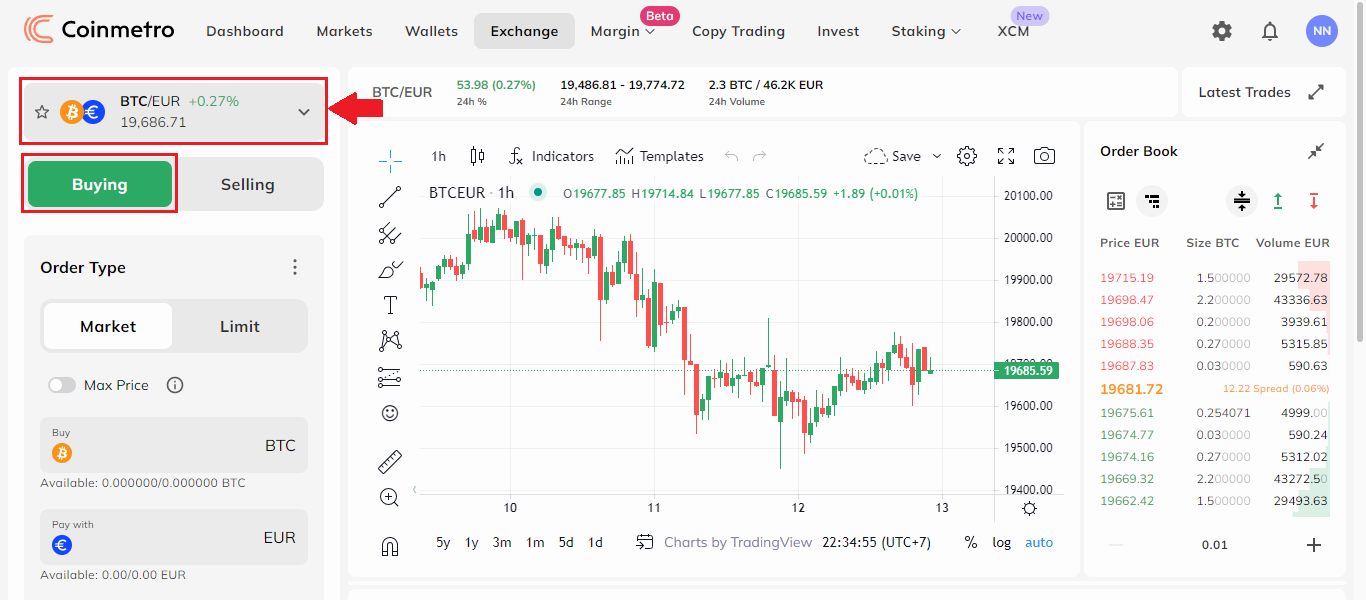
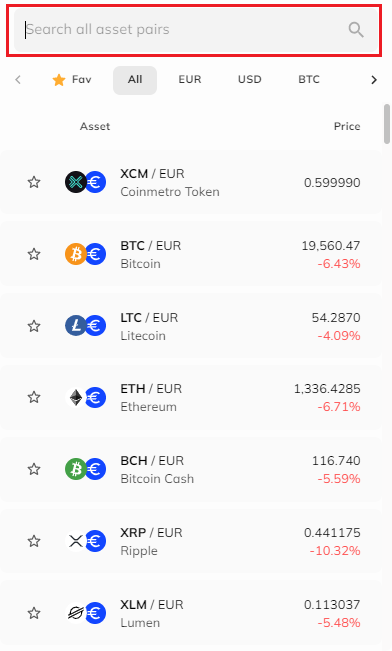
3. To search and look for the crypto you would need to exchange by simply typing in the crypto acronym in the [Search all asset pair] area.
Market Trading
After choosing the crypto type you can purchase the crypto by clicking on Buying.
For buying at the current Market Price:
(1) Click on the Market tab.
(2) Type how much to buy in the BTC area
(3) Or type in how much EUR (currency) area
(4) Click on Buy BTC @ Market to submit the decision.
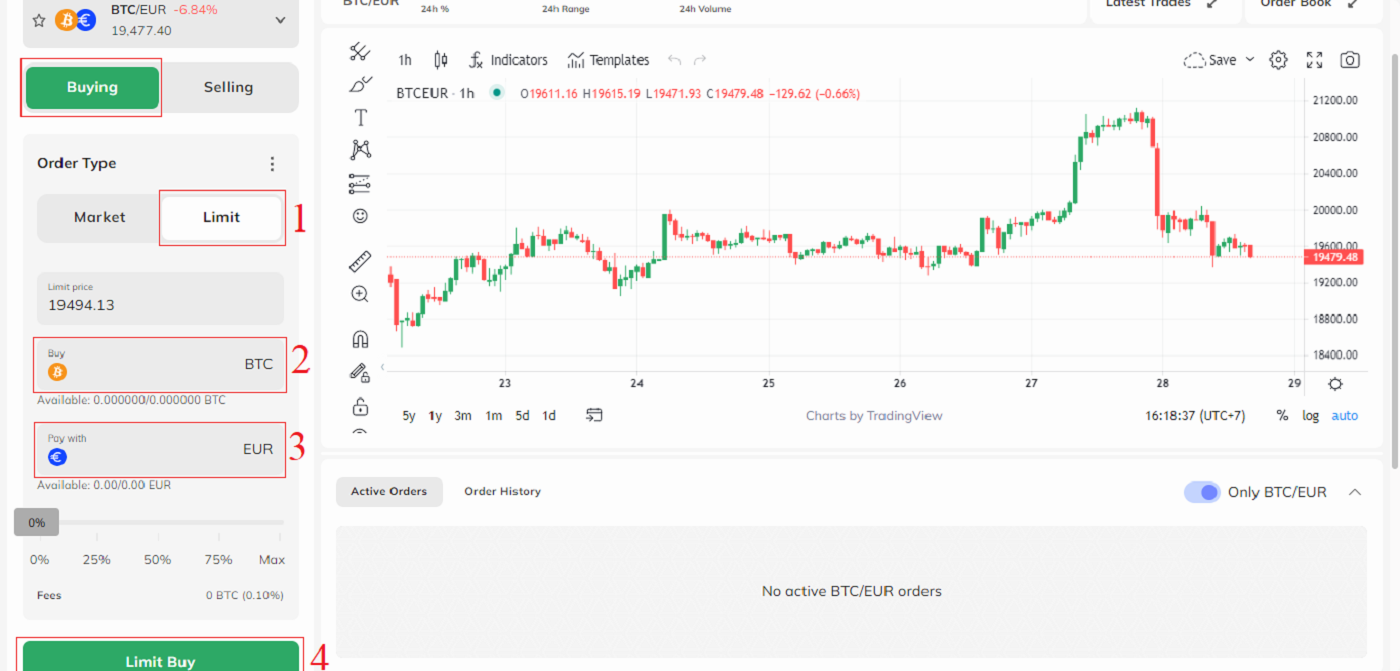
Limit Trading
For Limit Buying, follow these steps: (1) Click on the Market tab.
(2) In the BTC area type how much crypto you would like to buy,
(3) Or type in how much in EUR (currency) area to buy.
(4) Click on Limit Buy to submit the decision.
How to Sell Crypto on Coinmetro
1. Visit the Coinmetro homepage, Click on the Exchange tab to purchase or sell crypto.
2. Then choose the crypto to exchange. Here, we use BTC/EUR as an example.
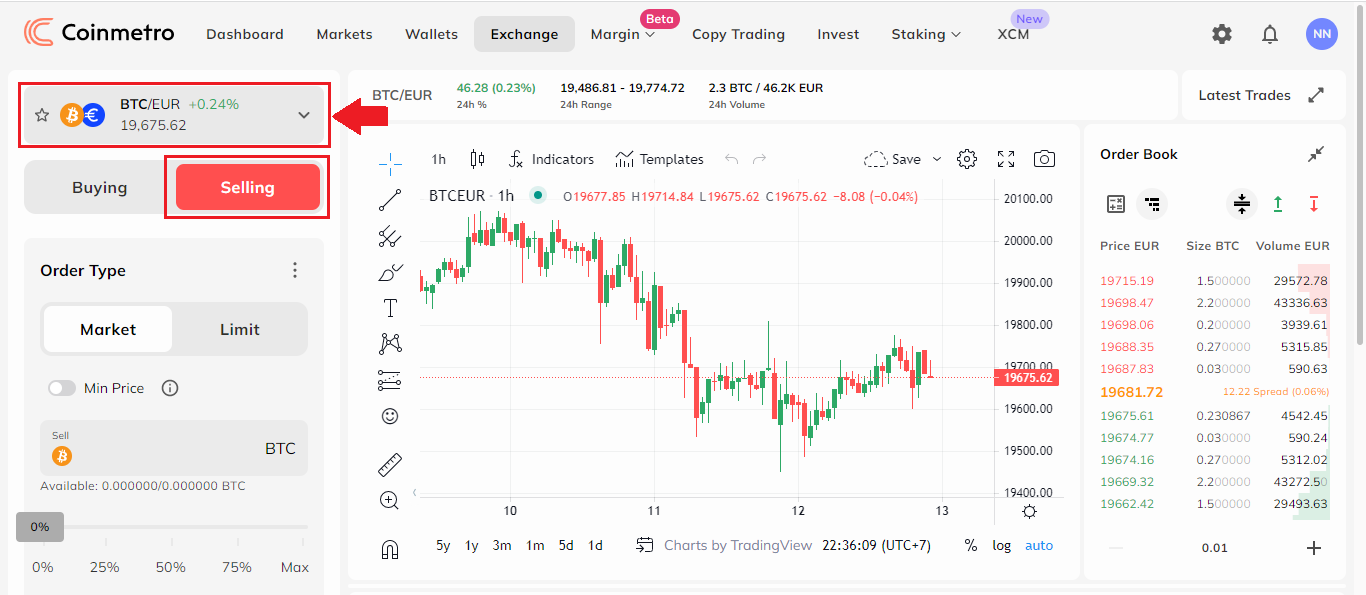
3. To search and look for the crypto you would need to exchange by simply typing in the crypto acronym in the [Search all asset pair] area.

Market Trading
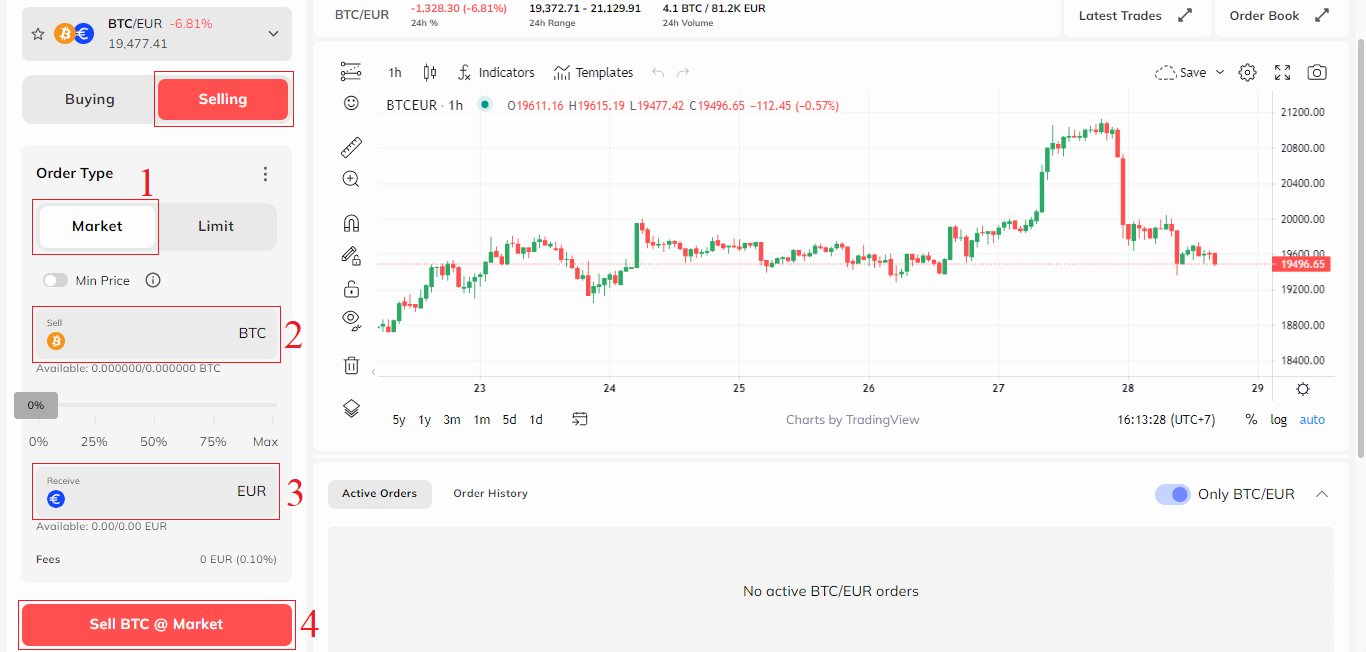
For Selling at the current Market Price:(1) click on the Market tab.
(2) Type how much to sell in the BTC area
(3) Or type in how much EUR (currency) area
(4) click on Sell BTC @ Market to submit the decision
Limit Trading
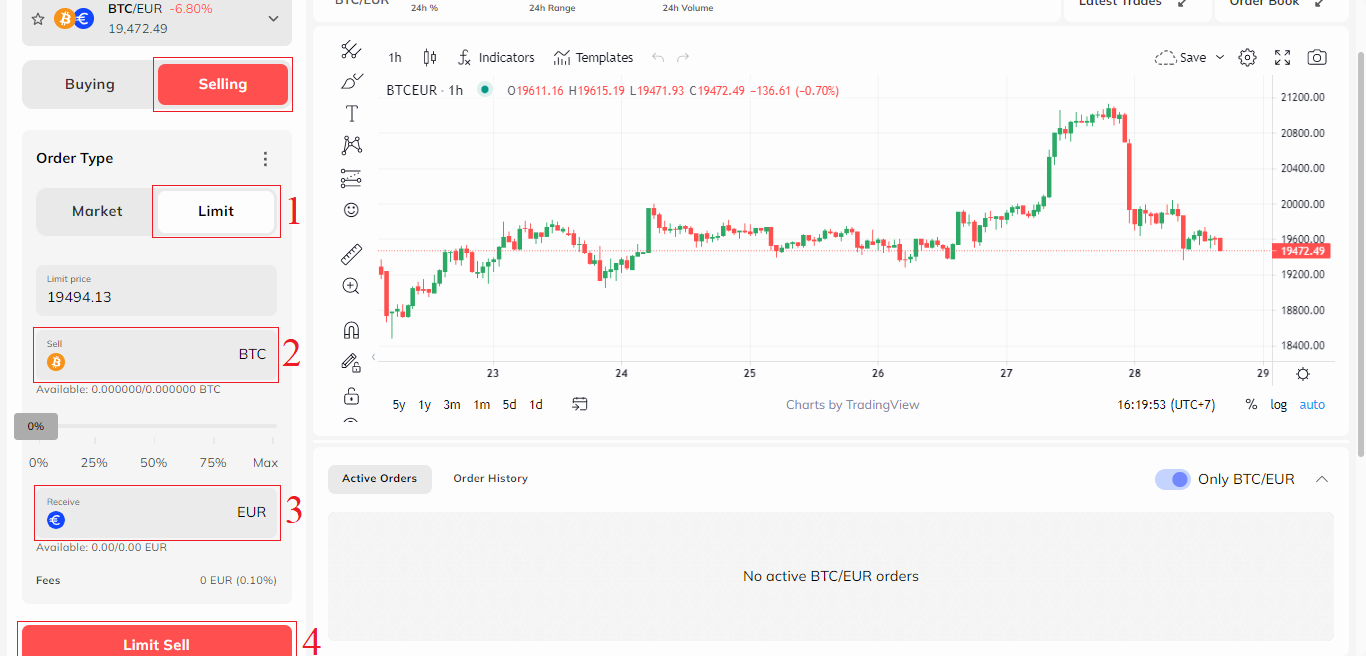
For Limit Selling, follow these steps: (1) Click on the Market tab.
(2) In the BTC area type how much crypto you would like to Sell,
(3) Or type in how much in EUR (currency) are to Sell.
(4) Click on Limit Sell to submit the decision.
How to Place a Stop Order
A Stop Order (also referred to as a stop-loss), is an order placed to buy or sell an asset once the price of the asset reaches a specified price (known as the stop price). When the stop price is reached, a stop order becomes a market order. A buy-stop order is entered at a stop price above the current market price. Stop orders can be placed both on the Coinmetro Exchange Platform and the Margin Platform.
In short, a stop order will trigger an order when an asset reaches a specific price. On the Coinmetro Exchange platform, you can use a stop order to sell an asset if it drops below a certain price, or buy an asset if it moves above a certain price.
When are Stop Orders useful?
An example of when a stop order could be useful is when chart analysis suggests a strong support level at a certain price. By placing a sell order at a price point below the support level, you can protect yourself against further loss, in case the support would break.
How to Enable Stop Orders
To enable the stop order option in the Exchange platform, advanced features must be enabled in the Settings menu, accessible via the cogwheel in the upper right section of your screen.
The Order Form for Stop Orders
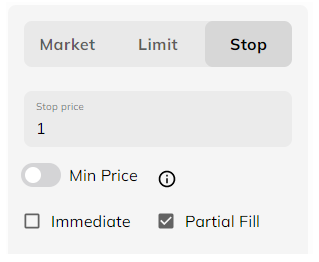
To explain the order form for a stop order, the first field to look at is the Stop Price. In the example below, the stop price has been set to 1 EUR for XCM. This means that once XCM reaches the price of 1EUR, either a market or limit order will be triggered.
How to Execute a Market Stop Order
The first way you can utilize a stop order is to execute a market order when your stop price is reached. To do this, all you need to do is input the Stop Price, enable Immediate Order and place your order.
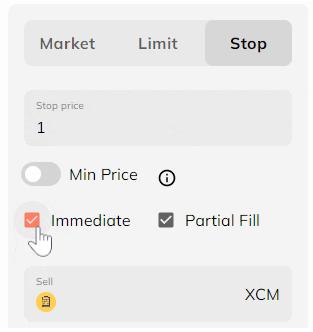
With the Partial Fill box checked, your order will be executed as Immediate-or-Cancel. If any portion of your order isn’t filled, it will be canceled.
With the Partial Fill box unchecked, your order will be executed as a Fill-or-Kill market order. If your whole order can’t be filled, it will be canceled.
Please note that market orders will generally be filled entirely at a fair market price on most of our available pairs. However, we advise you to always combine your Stop Price with a Max/Min (depending on if you are buying or selling) price, to protect you in case there are no orders available near your stop price, which otherwise might cause your market order to be executed at a loss.
How to Execute a Limit Stop Order
By setting a Max Price (when buying) or Min Price (when selling) together with your stop price, your stop order will execute a limit order once your stop price is reached.
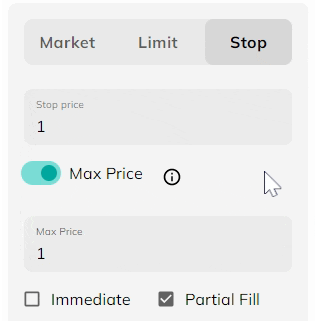
Without Immediate Order selected, it will place a limit order into the book at the specified price, which will remain until filled or canceled.
With a limit price set, the Immediate Order option should not be ticked. If this option is selected, it will execute as a market order up to your limited price. The Stop Price is at what price point your order will be executed.
How to Set a Stop Loss or Take Profit
What is a Stop Order?Stop orders are used to enter a position when the price breaks above or below a certain level (the Stop price). Stop orders are available on the Exchange Platform (with Advanced features enabled) and the Margin Platform.
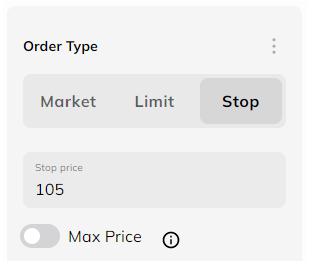
For example, if the price for QNT is currently 104 and you want to buy as soon as the price gets to 105, you can place a Stop Buy order with a stop price of 105.
Similarly, if you placed a Stop Sell order with a stop price of 100, you would sell once the price drops to 100. These are typically used to enter "breakout" trades when the price breaks through a key support or resistance level.
What is Take Profit?
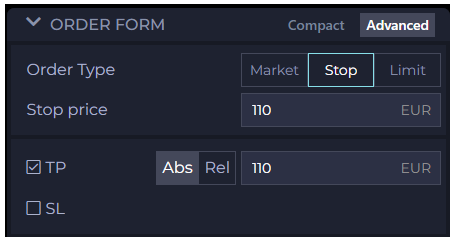
Take Profit (TP) can be set up by simply using a Limit Order at the price you wish to sell your asset to gain a profit.
For example, if I bought QNT at 100 EUR and would like to sell it once the price reaches 110 EUR, I would set a Limit Order to sell my QNT at the 1110 EUR mark. This offers an offhand approach to setting a Stop Loss because it is always good to have a figure in mind on when you would like to exit if the price starts dropping. The order will be visible in the order books from the start and other traders will see that you are buying QNT at the 110 EUR mark.
The Take Profit option is currently available on the Coinmetro Margin Platform; however, this is not yet available on the new Margin Beta but more advanced features are due to be added shortly! In the meantime, if you wish to set up a Take Profit (TP), you can do so by editing your order or position, or by using the Classic Margin Platform.
Summary
Stop Loss (SL) - Set at a price at which the order automatically closes, when the price of the investment reaches a specified lower price.
Take Profit (TP) - Set at a price at which the order automatically closes, when the price of the investment reaches a specified upper price.
In Margin Trading a new limit or stop order will always open a new position, even if you have an existing open position for the same pair. It’s possible to be both long and short in the same pair at the same time in margin trading.
In margin trading the take profit and stop loss are specified in the opening order or subsequently added to the open position.
How to Withdraw on Coinmetro
How to Withdraw Fiat from Coinmetro
Step 1: To begin, you must first go to your Coinmetro Dashboard and select [Withdraw].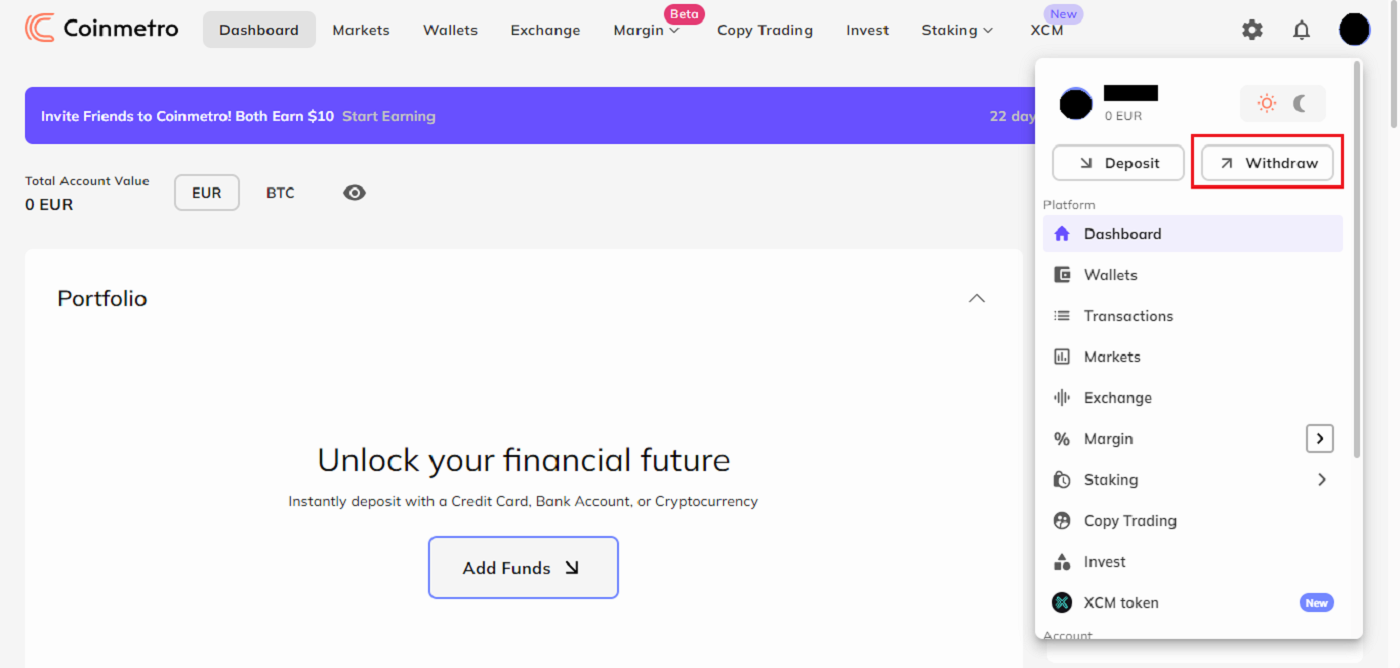
Step 2: From the dropdown menu, click on the currency you would like to withdraw. Please be aware that this list will only include the currencies that are available in your Coinmetro account.
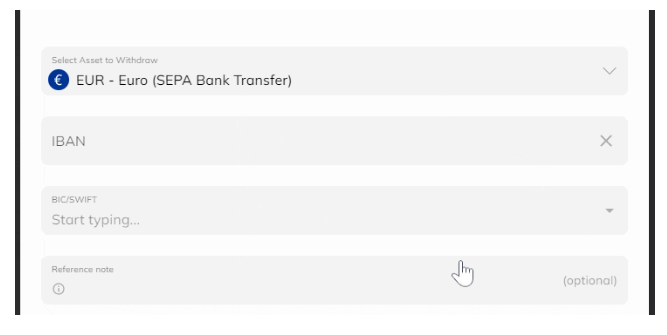
In the example below, we have selected to withdraw EUR via SEPA Bank Transfer.
Important Note: Funds must only come from accounts or cards that are in your name. We do not accept payments from third parties.
You will need to provide your residence address if you haven’t previously. You can submit your banking information if your residence address has already been given. Please be aware that you cannot send money to other individuals or organizations. Only your personal bank accounts are eligible for withdrawals.
Step 3: You will need to enter either your IBAN and SWIFT code (for EUR/International Transfers) or Sort Code and Account Number (for GBP Faster Payments).

If you already have a BIC/SWIFT code saved, you can select this by clicking on the downward-facing arrow and selecting the code from the dropdown list.
You now also have the option to leave a Reference Note when making a withdrawal.

Step 4: The amount you wish to withdraw must then be entered. The amount you want to receive can be manually entered in the "Amount" box. As an alternative, you can either click on "Min/Max" or just slide the toggle to the percentage you want to get.

How to Withdraw Cryptocurrencies from Coinmetro
Coinmetro is now under the obligation to collect, verify, transmit and store certain information about the sender and the receiver of cryptocurrency withdrawals. This means that if you are withdrawing crypto to an external wallet address, you will be required to confirm:
- Whether you are sending the crypto to your own wallet
- If you’re sending to a third party, the recipient’s full name and wallet address
- Whether you are sending the crypto to a wallet or another exchange.
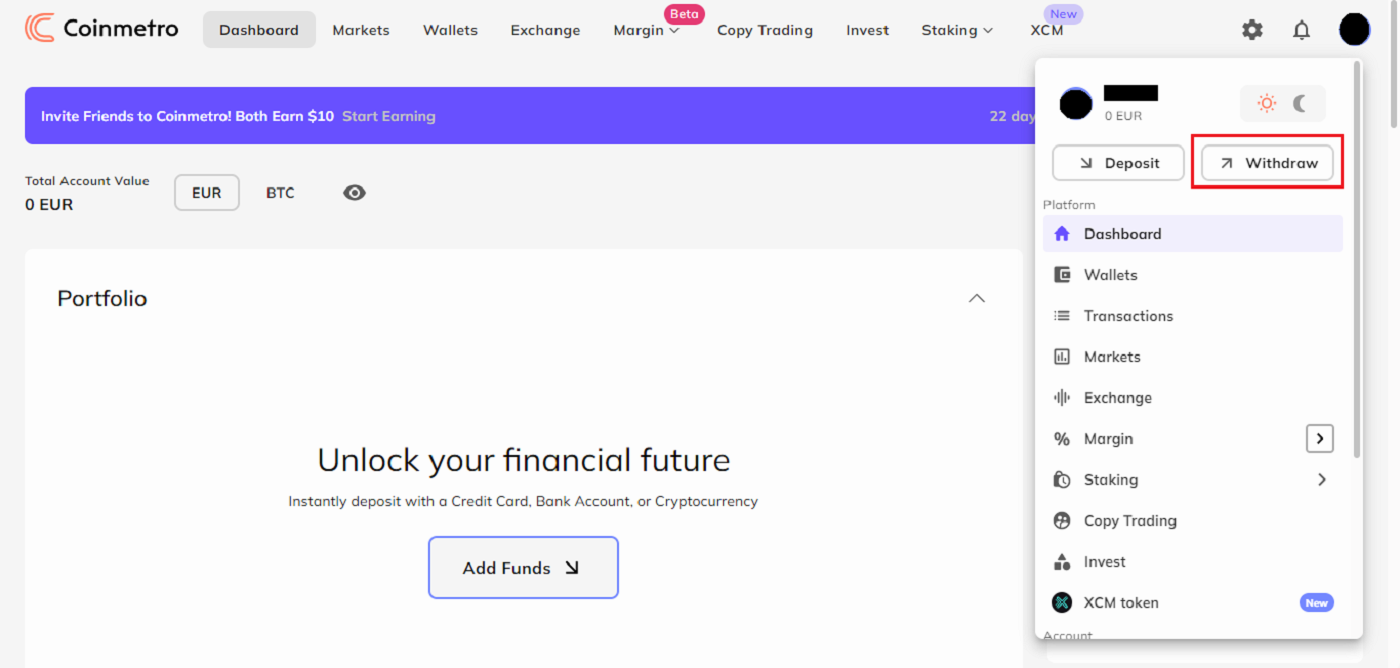
Step 1: To begin, you must first go to your Coinmetro Dashboard and select [Withdraw].
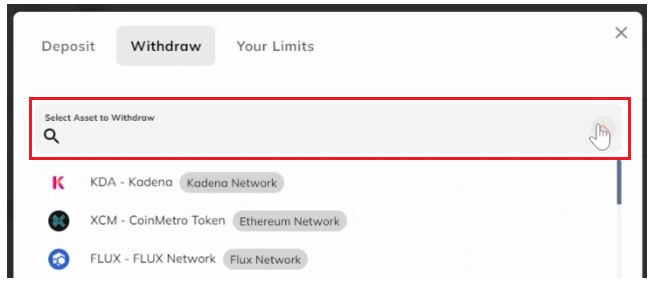
Step 2: Next, select the cryptocurrency you want to withdraw by clicking on it in the dropdown menu.
Step 3: The wallet address from the external wallet where you want to receive your funds must now be copied and pasted into the box. You should verify this again to make sure there are no errors.

Additionally, you have the option to add a remark and tell us a little bit about your withdrawal. "Withdrawal to my MetaMask wallet," for instance.

Step 4: The amount you wish to withdraw must then be entered. The amount you want to receive can be manually entered in the Amount box. As an alternative, you can either click on Min/Max or just slide the toggle to the percentage you want to get.

Making sure the sum is sufficient to pay network fees is crucial. You won’t be able to continue and will see the following error message if the quantity is insufficient:

By glancing at the blue information box, you can see the costs associated with this transaction as well as the sum you will get in your external wallet.

Step 5: Click Continue once you’ve double-checked that all the information is accurate. Once again, you can review the fees and the amount you will be getting and confirm that everything is accurate on the summary page that follows.

To confirm the transaction if 2 Factor Authentication (2FA) is enabled for withdrawals, you must input your 2FA code.
Step 6: Your request for a withdrawal will be approved after it has been verified. The only thing left to do is wait for your money to come with you!

Confirm Your Withdrawal Destination (For First-Time Withdrawals)
You will get a pop-up notice and an email asking you to confirm the transaction the first time a withdrawal is made to a wallet address. Please confirm your new withdrawal destination by clicking the button in the email with the subject "Please Confirm Your New Withdrawal Destination" before logging in to the platform. Per wallet address, you only need to perform this once.

Your withdrawal will proceed normally after confirmation.
Save Your Wallet Address (optional)
Once the withdrawal destination has been determined, you may name and remember each wallet address so that you won’t need to manually enter it when making further withdrawals to the same location.

On the withdrawal form, select My Wallets to access your stored wallets.

How to Withdraw AUD from Coinmetro
Step 1: Firstly, you will need to head over to your Coinmetro Dashboard, and then click Withdraw.

Step 2: From the dropdown menu, search for AUD. From the selection, choose AUD - Australian Dollar (SWIFT). To choose this option, you must have some Australian dollars in your Coinmetro account.
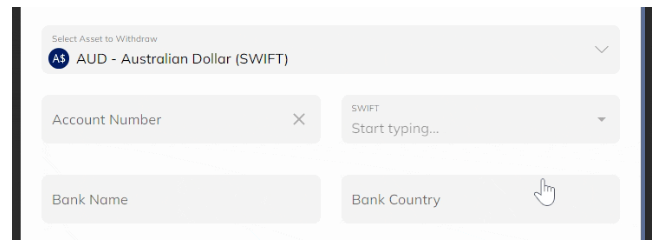
Step 3: Enter your [Account Number], [SWIFT Code], [Bank Name], [Bank Country], and [Beneficiary Address]. By clicking on My Accounts and choosing the appropriate account from the dropdown list, you can choose an account that is already saved.
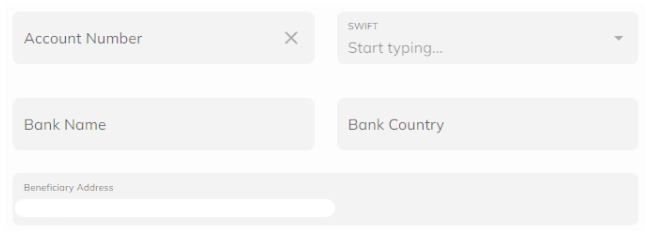
Step 4: Leave a Reference Note (optional).

Step 5: Enter the withdrawal [Amount].

After that, you must input the amount you wish to withdraw. You can manually enter the sum you want to get in the Amount field. As an alternative, you can just click on Min/Max or click and slide the toggle to the desired percentage.
Important Note: the amount is enough to cover withdrawal fees. If the amount is not sufficient, you won’t be able to proceed.
Step 6: Confirm your details.

Click Continue once you have double-checked that all the information is accurate. Once again, you can review the fees and the amount you will be getting and confirm that everything is accurate on the summary page that follows.
Note: It’s important to ensure you double-check that all information has been entered correctly. Once a transfer is sent, it is not possible to edit any information and transactions are not able to be reversed.
How to Withdraw GBP (Great British Pounds) from Coinmetro
Step 1: To begin, you must first go to your Coinmetro Dashboard and select Withdraw.
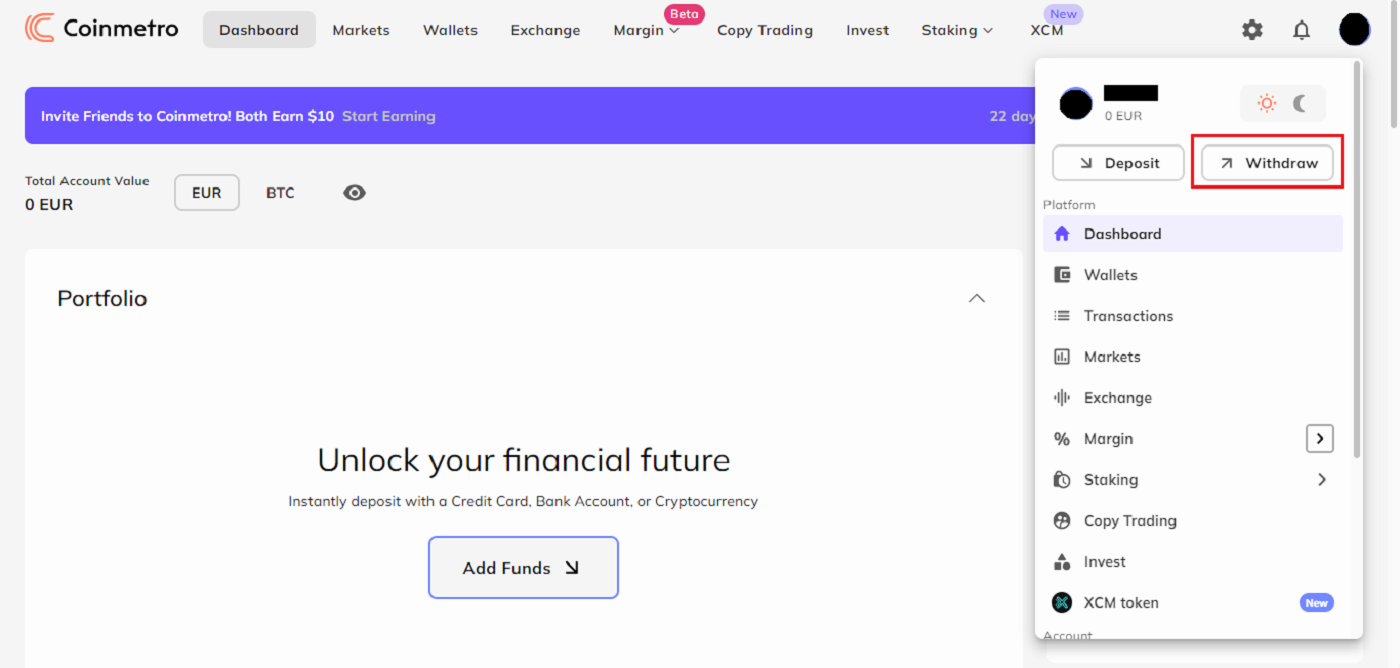
Step 2: From the dropdown menu, search for GBP
From the selection, choose GBP - Pound Sterling (Faster Payments). You will not be able to choose this option if you do not have any GBP accessible in your Coinmetro account.
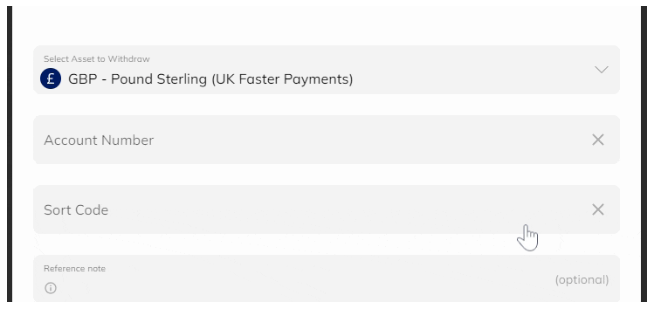
Step 3: Enter your Sort Code and Account Number

Step 4:You now also have the option to leave a Reference Note when making a withdrawal.

Step 5: Enter the withdrawal Amount
After that, you must input the amount you wish to withdraw. You can manually enter the sum you want to get in the Amount field. As an alternative, you can just click on Min/Max or click and slide the toggle to the desired percentage.

Step 6: Confirm your details
Click Continue after making sure all the information is accurate. After that, you will be taken to a summary of your transaction, where you may once more review the fees and the amount you will be getting and Confirm that it is accurate.

Your request for a withdrawal will be approved once it has been verified. The only thing left to do is wait for your money to come with you!
How to Withdraw USD (US Dollars) from Coinmetro
Step 1: Firstly, you will need to head over to your Coinmetro Dashboard, and then click Withdraw.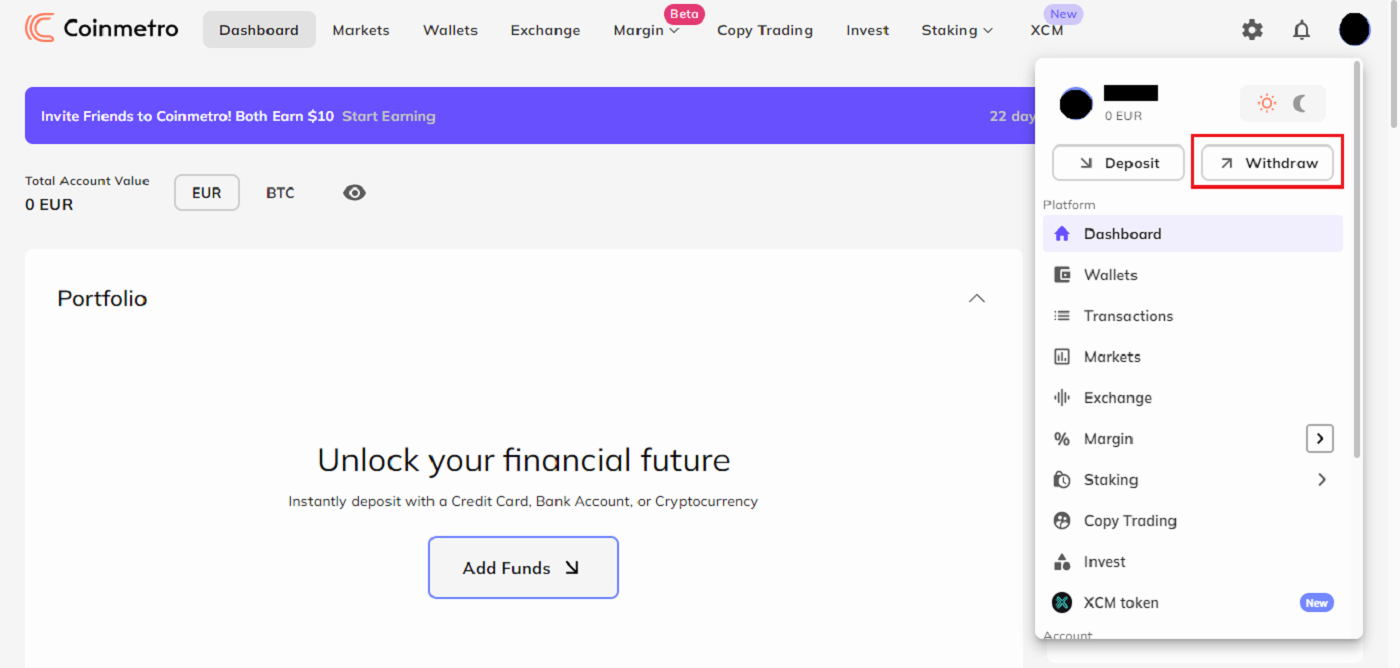
Now look up USD in the dropdown menu. You have two choices when withdrawing US dollars to your bank account:
- USD - US Dollar (AHC)
- USD - US Dollar (Domestic Wire)
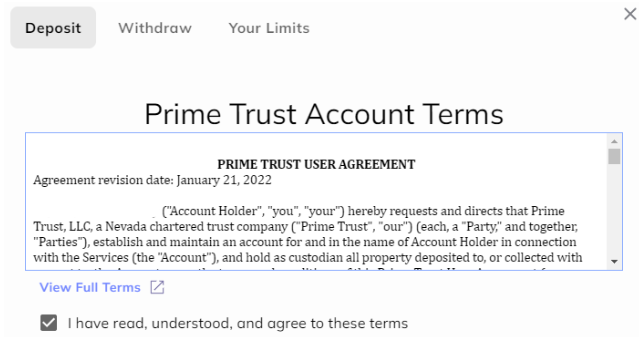
Please be aware that owing to additional checks from our US banking partner, the verification for your first USD deposit may take up to 5 working days to be approved. Once this is finished, an email will be sent to you.

For Prime Trust to verify your identity, you will also need to enter your Social Security Number if you reside in the US.

Sadly, we are unable to manually validate your account if verification fails, thus you will need to choose another withdrawal method.
Step 2: Select your withdrawal method.
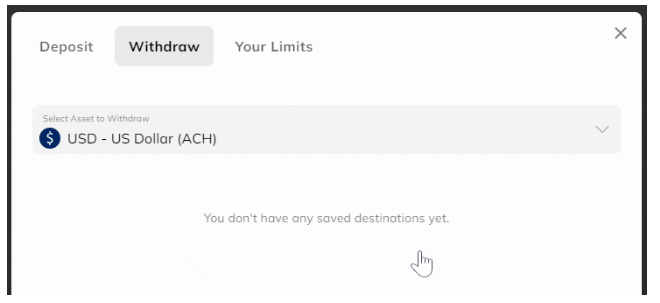
- For USD ACH Withdrawals
You can select the USD ACH Bank Transfer option from the dropdown menu if you are in the United States.
- For USD Domestic Wire Withdrawals
Select the USD Domestic Wire option from the dropdown menu.
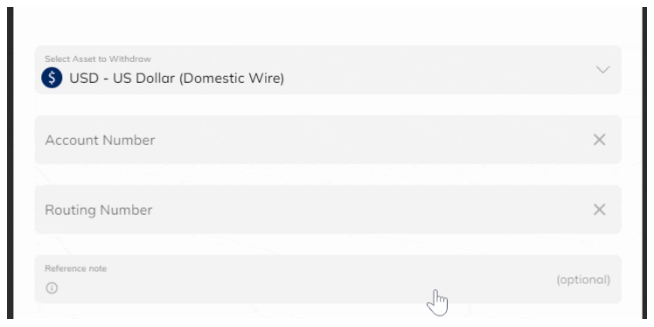
Now, you will need to enter your Account Number and Wire Routing Number.

Step 3: You now also have the option to leave a Reference Note when making a withdrawal.

Step 4: Enter the withdrawal amount
The Amount you wish to withdraw must then be entered. The amount you want to receive can be manually entered in the Amount box. As an alternative, you can either click on Min/Max or just slide the toggle to the percentage you want to get.

Step 5: Confirm your details.
After carefully checking all information is correct, click Continue. This will then bring you to a summary of your transaction where again you can check the fees and the amount you will be receiving, and Confirm that this is correct.

How to Withdraw EUR (Euros) from Coinmetro
Step 1: Firstly, head over to your Coinmetro Dashboard, and then click [Withdraw].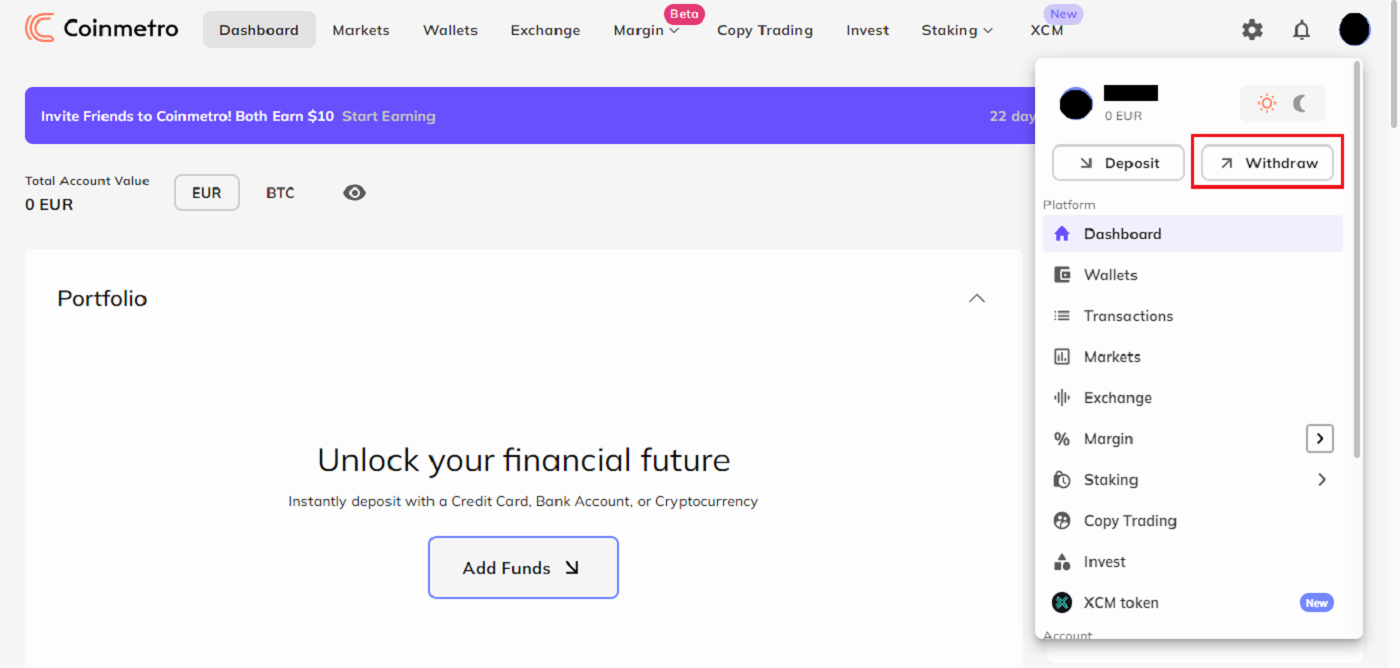
Now look for EUR in the dropdown menu. When you want to deposit euros into your bank account, you have two choices:
EUR SEPA Bank Transfer
- EUR SEPA Bank Transfer
- EUR SWIFT Transfer
- For EUR SEPA Bank Transfers:
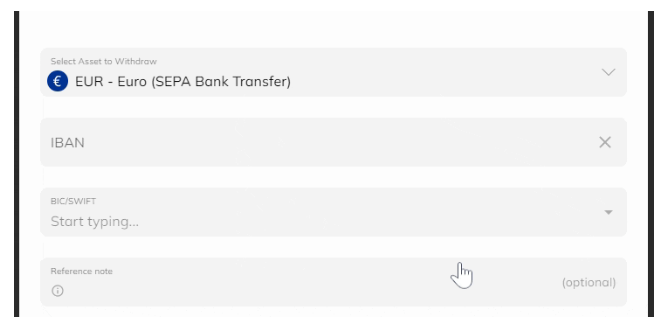
Add your IBAN, BIC, and SWIFT codes. By clicking the downward-pointing arrow and choosing the code from the selection list, you can select a BIC/SWIFT code that is already saved.

- For EUR SWIFT Transfers:
You can still go to your Coinmetro Dashboard, click Withdraw, and choose the EUR - Euro (SWIFT) option if you’re not in the SEPA zone.

Enter your Account Number, SWIFT Code, Bank Name, Bank Country, and Beneficiary Address.
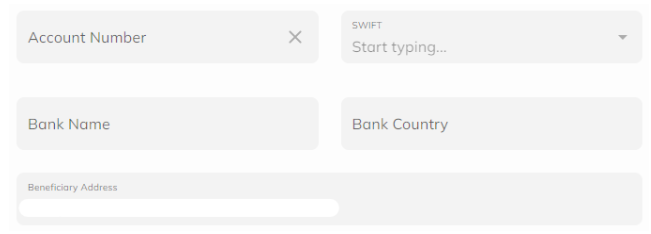
Step 3: Leave a Reference Note (optional). Additionally, you can now provide a reference remark when you withdraw money.

Step 4: Enter the withdrawal Amount. Then, you will need to enter the amount that you would like to withdraw. You can manually type the amount you would like to receive into the Amount box. Alternatively, you can click on or slide the toggle to the percentage you would like to receive, or just click on Min/Max.

It is important to ensure that the Amount is enough to cover withdrawal fees. If the amount is not sufficient, you won’t be able to proceed.
Step 5: Confirm your details.
Click Continue after making sure all the information is accurate. Following that, you will be taken to a summary of your transaction, where you may once more review the fees and the amount you will be getting and confirm that it is accurate.

Note: It’s crucial to confirm that all of the information has been input accurately. No information can be changed after a transfer has been sent, and no transfers may be undone.
Frequently Asked Questions (FAQ)
Register
What is the difference between a Personal and a Business Account?
The difference between personal accounts and business accounts is who can deposit fiat into the account;
The difference between personal accounts and business accounts is who can deposit fiat into the account;
- Personal accounts can only receive funds from a personal bank account in the account owner’s name who has completed their profile verification.
- Business accounts can only receive funds from bank accounts under a verified business name or from a personal account of the sole beneficial owner.
Can I assign a beneficiary to my Coinmetro account?
Only in exceptional circumstances can you assign a beneficiary to your Coinmetro account. Each beneficiary request we receive is passed over to and reviewed by our compliance team. Should the request be approved, the beneficiary will have full access to your Coinmetro account.
If you would like to make a request to assign a beneficiary to your account, we kindly ask you to please provide us with the following details via email:
-
The reason that you wish to assign the beneficiary,
-
The full name and date of birth of the beneficiary,
-
The residency of the beneficiary,
-
The beneficiaries email address.
Once we have all the above details, we will email the beneficiary for confirmation.
Is the download of the program to a computer or smartphone required?
No, it’s not necessary. Simply complete the form on the company’s website to register and create an individual account.
Verify
Why have I been asked to resubmit my selfie for Profile Verification?
If you have received an email from us asking you to re-upload your selfie, this means that unfortunately, the selfie you submitted could not be accepted by our compliance team. You will have received an email from us explaining the specific reason why the selfie was not acceptable.
When submitting your selfie for the profile verification process, it is very important to ensure the following:
- The selfie is clear, unblurred, and in color
- The selfie is not scanned, re-captured, or modified in any way,
- There are no third parties visible in your selfie or liveness reel,
- Your shoulders are visible in the selfie, The photo is taken in good lighting and no shadows are present.
Ensuring the above will enable us to process your application faster and smoother.
Can I submit my ID documents/selfie for Profile Verification (KYC) via live chat or email?
Unfortunately, due to compliance and security reasons, we cannot personally upload your profile verification (KYC) documents via live chat or email.
We adhere to high security and compliance practices, so we believe in and encourage our users to submit their applications with minimal involvement by outside parties.
Of course, we can always provide support and suggestions on the process. We have extensive knowledge of what documents are most likely to be accepted and verified with no problem.
How long does Address Verification take?
When it comes to submitting a valid proof of address document to verify your address, please note that wait times are typically up to 48 hours; although this may take a little longer when we have a higher volume of documents to review.
Our compliance team is constantly working hard to review all verification documents in the order that they have been received by us, and it is not possible to have your documents prioritized as we value each and every one of our customers.
Please rest assured that our team will review your documents as soon as possible. In the meantime, we thank you for your patience whilst the team checks all submissions as fast as they can.
Once the review has been completed, you will receive an email with the outcome.
Deposit
What verification do I need to Deposit USD?
Should you reside in the United States, and you are looking to make a deposit in USD with either the ACH deposit method or Wire transfer (domestic wire), please note that the first time you go to deposit or withdraw US dollars from your Coinmetro account, there is a little further verification that is required from our banking partner.
Firstly, ensure that you have completed your Coinmetro Profile Verification. A verified account is required to deposit both fiat and crypto into your Coinmetro account. For fiat deposits, you will also need to save your address in the system.
What are the Deposit limits for Fiat?
GBP Faster Payments, USD Local Wire, International Wire, SWIFT, and SEPA depositsThere are no daily deposit limits; however, there is a €500,000 or equivalent limit per month for Level 1 Verification. For users verified to Level 2, this limit does not apply.
Credit Card transfers
Our required minimum deposit amount is €10 or equivalent, and the maximum deposit limit is €5,000 per transaction.
USD Local ACH deposits
The current limit is $2500 per transaction and $5000 per month.
Trading
Where can I see my active orders?
You can easily view your active orders on the Exchange Platform with just the click of a button!
On Desktop
Firstly, from your Dashboard, head to the Exchange Platform by clicking the ’Exchange’ tab at the top of the page.

Then, scroll down and click on the ’Active Orders’ tab to view your active limit orders.

On the Coinmetro Mobile app
From your Dashboard, you can enter the Exchange Platform by either tapping on the ’Buy/Sell icon below your account balance, or tapping on the ’More’ icon in the bottom right-hand corner, then clicking on ’Exchange’.

Then, scroll down and click on the ’Active Orders’ tab to view your active limit orders.

Where can I see my Order History?
To check your order simply on the Order History On Desktop
1. From the Dashboard, by clicking on the Exchange tab on the top column to purchase or sell crypto.
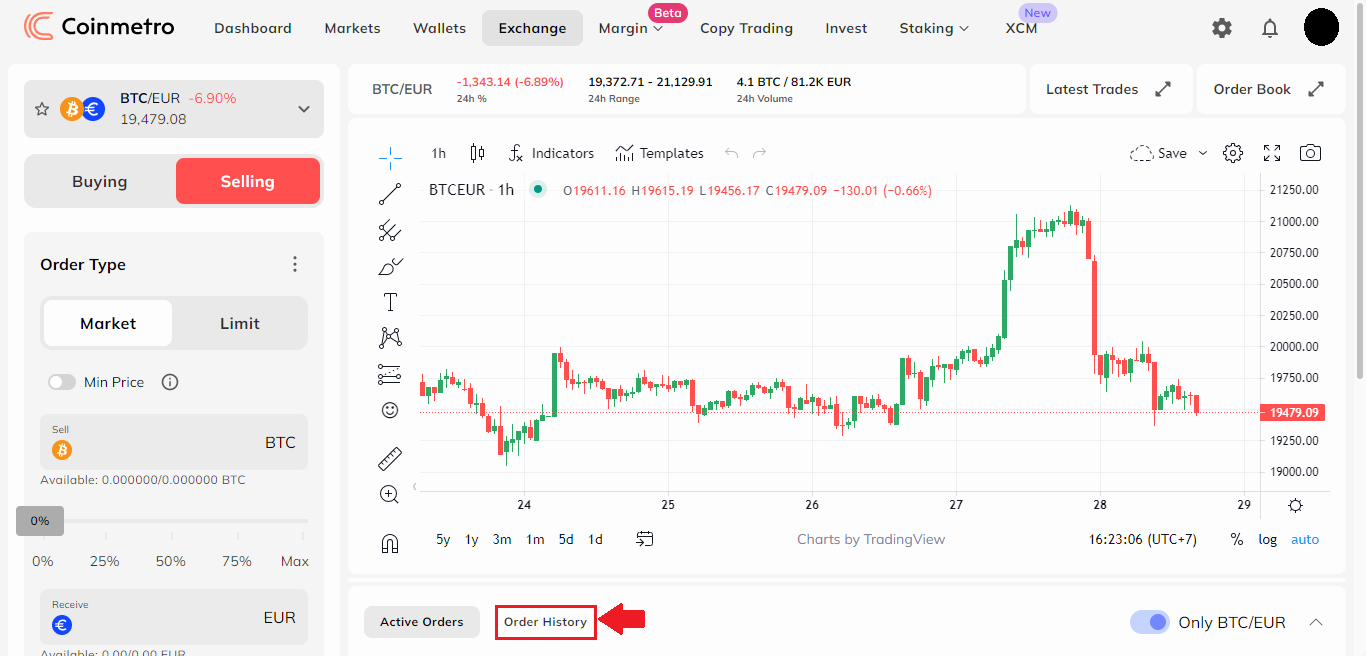
2. Then, scroll down and click on the Order History tab to view your full market and limit order history. You can also see your canceled orders by selecting the Show Cancelled toggle.

On the Coinmetro Mobile app
From your Dashboard, you can enter the Exchange Platform by either tapping on the ’Buy/Sell icon below your account balance, or tapping on the ’More’ icon in the bottom right-hand corner, then clicking on ’Exchange’.

Then, scroll down and click on the ’Order History’ tab to view your full market and limit order history.
Maker Fees vs Taker Fees
When placing an order on the Coinmetro Exchange Platform, you would either incur a taker or maker fee. So, what is the difference between the two?
Taker Orders
Clients who place an order that is filled immediately, such as a market order will be charged a taker fee. These orders take liquidity from the order book, and as such are called takers. Takers on the Coinmetro Exchange will pay a commission of 0.10%.
Maker Orders
A maker order is a limit order which rests in the order book for any period. This terminology comes from the fact that placing limited orders on the books helps to “make the market,” which makes you a “market maker”.
Makers pay no commission on the Exchange Platform, and the maker fee is 0%. For Margin trades, you will be charged a 0.1% fee for the initial and subsequent trade (in and out of the trade), equalling 0.2% total.
Earn XCM from Trading
Staking your XCM at Coinmetro enables traders to earn XCM rebates from their trading fees, among other benefits. Up to 25% of taker fees can be paid back in XCM, and makers can earn up to 50% of the taker’s net fees.
The XCM Token Utility
100% of all the trading fees will be used to purchase XCM directly from the market, and up to 50% will be time vaulted and taken out of the supply. As the trading volume increases, so will automated market buying.
What is an Order Book?
An order book on the Exchange Platform is simply a list of buy and sell orders placed by market makers for a specific trading pair such as BTC/EUR or ETH/USD.
Below is an example of the BTC/EUR order book.
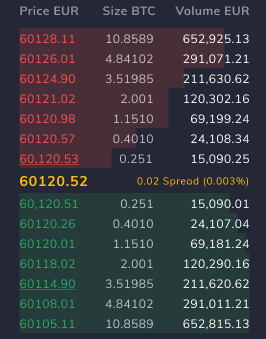
As we can see in the image above, the order book is split into two sections:
-
Bids (buyers) in green
-
Asks (sellers) in red.
In the middle of these highlighted in yellow, we can see the “mid-price”. This is simply just the price in the middle of the lowest ask and highest bid.
Anyone can be a “market maker” by simply placing a Limit Order. Whilst your limit order is active, this will appear in the order book underlined. In the example below, we have placed a bid (buy) for BTC at 60,115.00 EUR.

As you can see, your active order will appear on the green side as it is bid, and you are saying you want to buy BTC for this specified price. Essentially, your order is placed in a queue until it is filled by another trader, or if you decide to cancel it.
Spread
When we are referring to the spread of an order book, this can easily be described as the difference in price between the lowest ask and highest bid. The spread can be displayed as an absolute value which is €0.02, or as a % value which is 0.003% as shown in the example below.

Whilst it is common to see either one of the other, Coinmetro displays both for transparency.
Cumulative Orders
Coinmetro allows users to control how they visualize the order book in multiple ways.
Firstly, you can view all the orders in the book cumulatively. This means that instead of seeing multiple levels and the amount at each price level independently, you can see the sum as you look up the book. This can be achieved by selecting the symbol as shown below.

This feature is extremely useful in case you are placing a market order and the order book is fairly thin/illiquid. You will be able to see exactly how your buy or sell order will impact the price of the asset you are trading, which can help you determine if you wish to wait/place a smaller or larger order, or use another order type such as a limit order.
Cumulative Volume
Cumulative volume essentially works the same as the cumulative order book; but instead of showing the values cumulatively, it only shows the volume bars (the red and green bars in the book). This can be achieved by selecting the symbol shown below.

This feature can be very useful at a glance to see where there are larger orders or ’holes’ in the order book.
Withdraw
Where can I find my XRP destination tag?
A common issue on why XRP withdrawals fail is due to an incorrect tag being entered. Here is how you can ensure that your XRP transaction is successful by entering the correct destination tag.
Cryptocurrency Exchanges
If you are withdrawing XRP to another cryptocurrency exchange, please ensure that you are using the correct tag provided by the external exchange.
If the tag is entered incorrectly, this may, unfortunately, result in the loss of your funds.
Personal Wallets
If you are withdrawing your XRP to a personal wallet, you can input any tag; however, please note that there cannot be any leading zeroes; for example, 123 would be a valid tag, but 0123 would not.
How long does it take?
The processing of withdrawals can take up to 24 hours at the maximum, although most of the time they are granted and sent out right away. In the industry, Coinmetro offers some of the fastest withdrawal times!
What are the fees?
Cryptocurrency withdrawal fees are 0.15% + Network Fees; however, KDA withdrawals are free!
